These installation instructions are applicable to the following series:
- 14FHK-S: Standard Filter Housings / 14FHK-SS: 304SS Standard Filter Housings
- 14FHK-SL: Slimline Filter Housings
- 14FHK-G: Giant Filter Housings / 14FHK-GSS: 304SS Giant Filter Housings
- 14FHK-HTR: High Temperature Filter Housings
IMPORTANT: Read all specifications, installation instructions, and warnings before installing water filter housings.
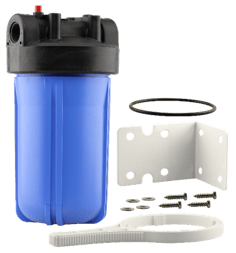
Parts and Materials Included
- Filter housing
- Mounting bracket and hardware
- Filter bowl wrench
- Replacement O-ring
Tools and Materials Required
- Adjustable wrench
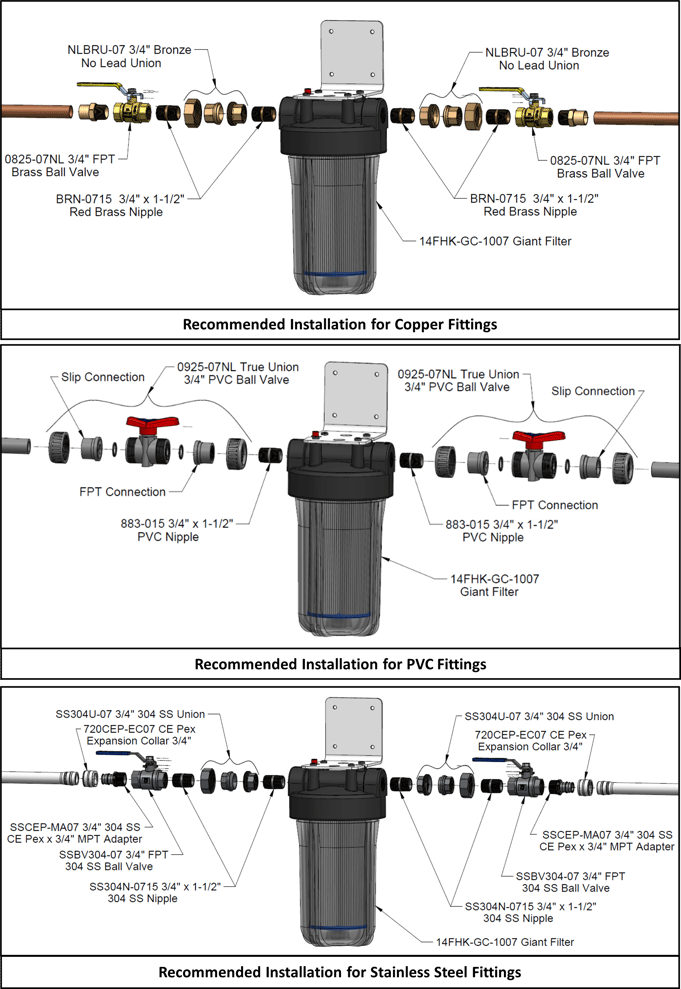
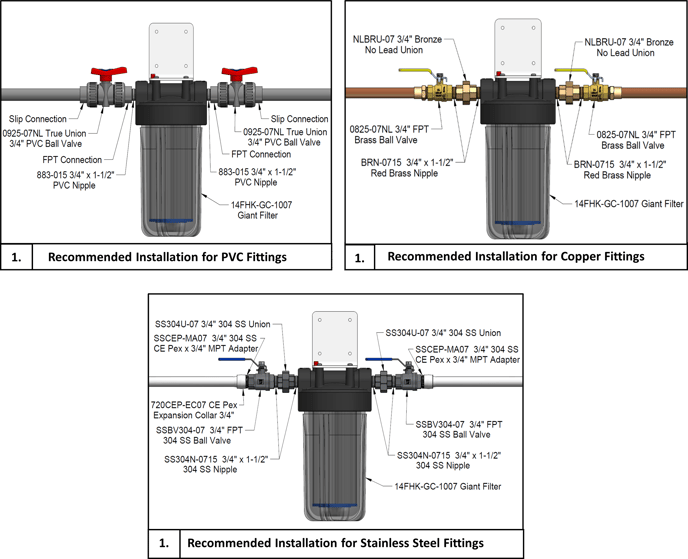
- Fittings (refer to diagrams below)
- Ball/stop valves (refer to diagrams below)
- Silicone based lubricant
- Pipe cutter
- Sandpaper and pipe deburring tool
- Pipe thread sealant
- Tape measure and pencil
- Filter cartridge
- Optional: Jumper Wire
The following diagrams outline the recommended parts and layout for the filter installation. The filters can be installed with copper, PVC, or stainless steel fittings and valves, for example.
Precautions
WARNING: Risk of electrical shock. If your water pipes are used to ground your house’s electrical system, install jumper wires around the filter. Consult a building inspector or licensed electrician for more information.
WARNING: Do not use with water that is microbiologically unsafe or of unknown quality without adequate disinfection before or after the system.
CAUTION: All filtration systems contain parts that have a limited service life which cannot be easily detected. Therefore, filter housings should be installed in an area where leakage will not cause property damage.
To reduce the risk associated with property damage due to housing failure and leakage:
- Installation and use must comply with all state and local plumbing codes.
- Where there is UV exposure, always use blue bowls, not clear bowls.
- Do not expose to household chemicals and solvents such as aerosol sprays, cleaning products, and insecticides.
- Do not install where water hammer conditions may occur or else install a water hammer arrestor.
- Replace clear filter bowls every 5 years and blue bowls every 10 years. If your bowl has been in use for more than the recommended period, it should be replaced immediately. Be sure to date the bowl for reference.
Installation Instructions
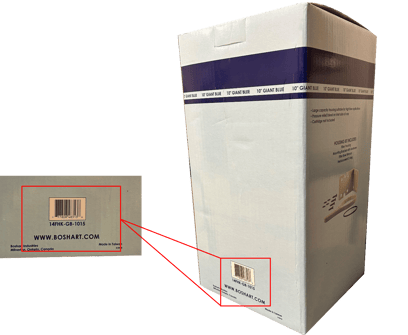
Before you begin the installation clearly write down the full filter model number and date of installation and secure it to the wall close to the filter unit for future reference and replacement parts. One option is to cut out the model number and UPC code from the side of your filter housing box. Write the date of installation on the back and secure it to the wall.
Note: Allow at least 2” above the filter head (for bracket, housing, and shut off valve installation) and at least 3” below the filter bowl (for changing the cartridge).
- The recommended installation has a shut-off valve on both the inlet and outlet sides of the filter.
- Using thread sealant, hand tighten pipe fittings to the new filter head, being careful not to cross threads. Using the wrench, firmly tighten one half turn only. Do not overtighten.
- Turn off the water supply and release system pressure by opening the nearest faucet. Leave the faucet open.
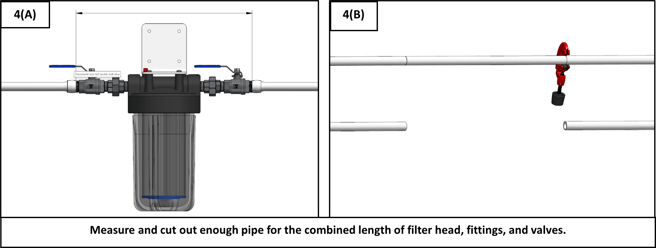
- Housing replacement: Disconnect pipe/tubing from the filter head connections. New installation: Measure (4A) and cut out (4B) enough pipe to allow for the total combined length of filter head, fittings, and valves to be installed. Have a bucket handy to catch any water that may come out of the pipe. Remove burrs and sharp edges from pipe ends.
- Mounting Bracket: Positioning the end marked “IN” facing the incoming water supply line, install onto the filter head using the screws provided. Mark out the location on the wall ensuring it is level, centered, and has proper support. Mount the bracket into position.
- Align filter assembly with ends of pipe. It will be necessary to spread the ends of the pipe apart to install filter assembly. Using two adjustable wrenches, hold incoming adapter securely with one wrench and tighten nut with second wrench. Repeat procedure for outgoing adapter.
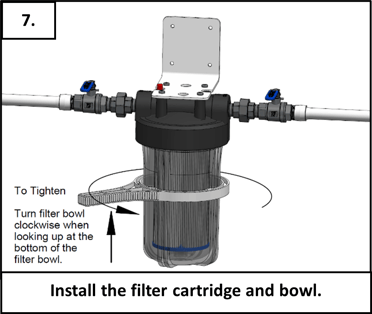
- Install the filter cartridge and filter bowl onto the filter head. Turn the bowl until hand tight. Do not overtighten.
- Close all valves (except for the nearest faucet) and slowly turn on the water supply. Depress and continue to hold the red air release button while slowly opening the inlet valve. Allow water to fill the housing until it flows out of the release button. Open the outlet valve slowly to purge air from the line.
- Keep the faucet open to flush the system for several minutes before use. Check for leaks.
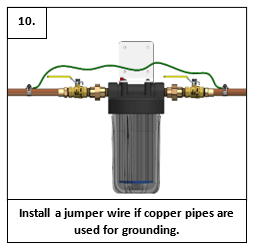
- Optional: If water pipes are used to ground electrical system, install a jumper wire. Warning: Risk of electrical shock. Jumper wire must satisfy all NEC or CEC and local codes.
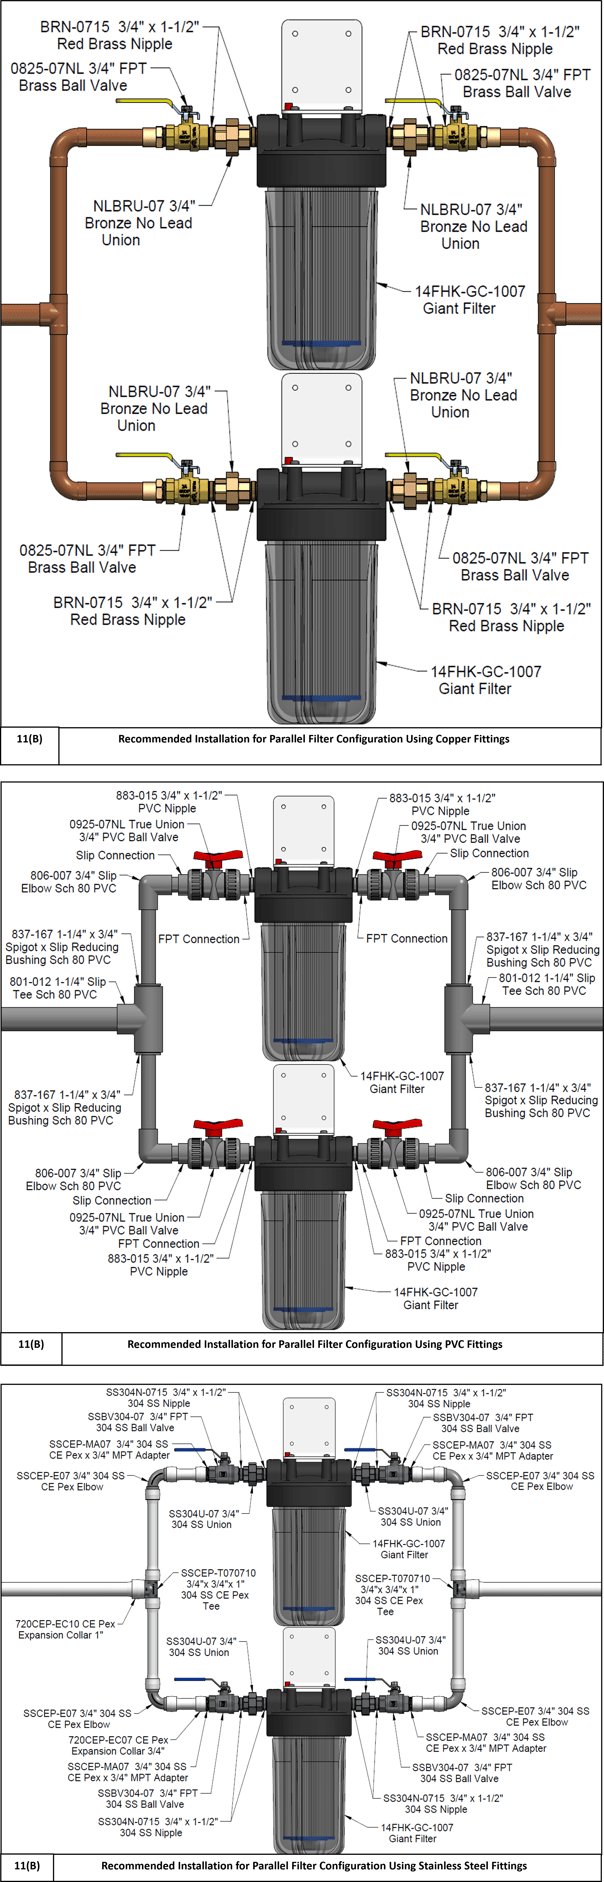
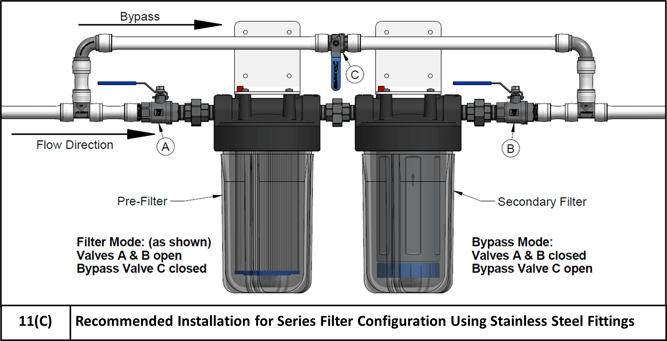
- Optional: Install a bypass section around the filter (A), a parallel filter configuration (B) or a series filter configuration (C). The diagrams below outline what materials are required in order to install a bypass system or parallel filter.
A) Bypass System: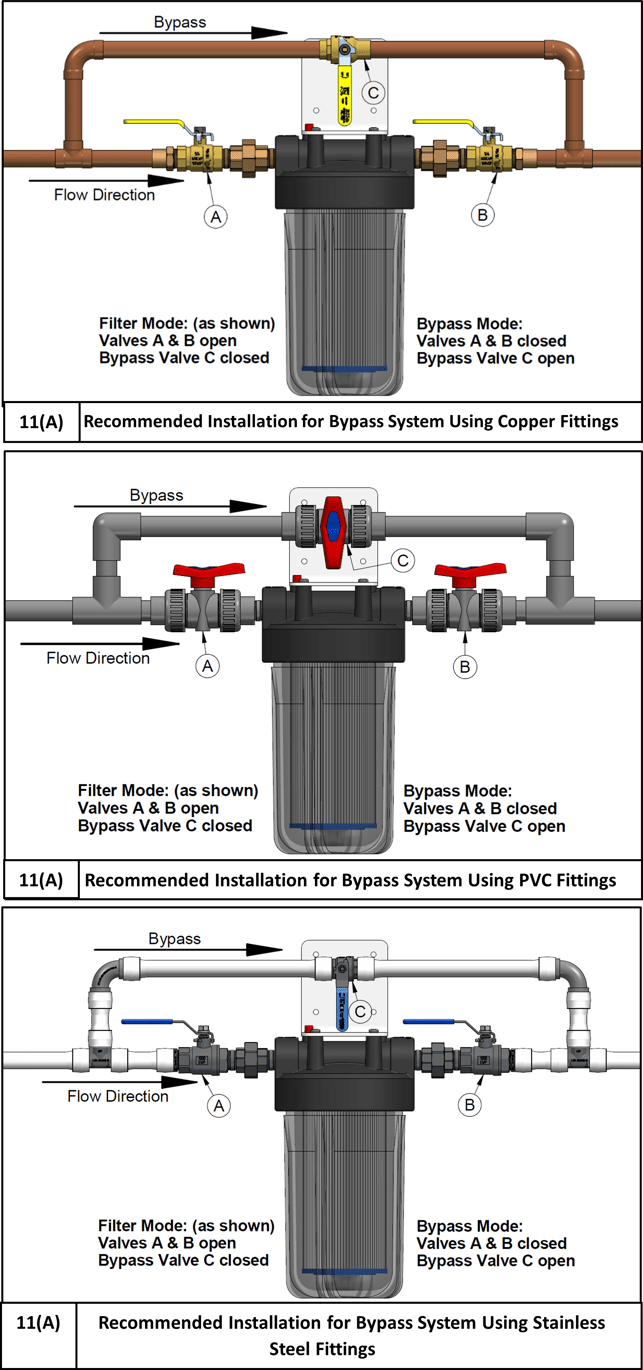
B) Parallel Filter Configuration:
C) Series Filter Configuration:
In some cases, plumbing water filters in series can make sense in order to extend the life of expensive filter media. Two filters with different rating levels can be arranged so that the first filter (pre-filter) removes the bulk of the large, coarse particles. The secondary filter will be chosen to filter out smaller, fine particles. The secondary filter is often a carbon taste and odor filter cartridge. Doing this will extend the life of the secondary filter, which is often more expensive.
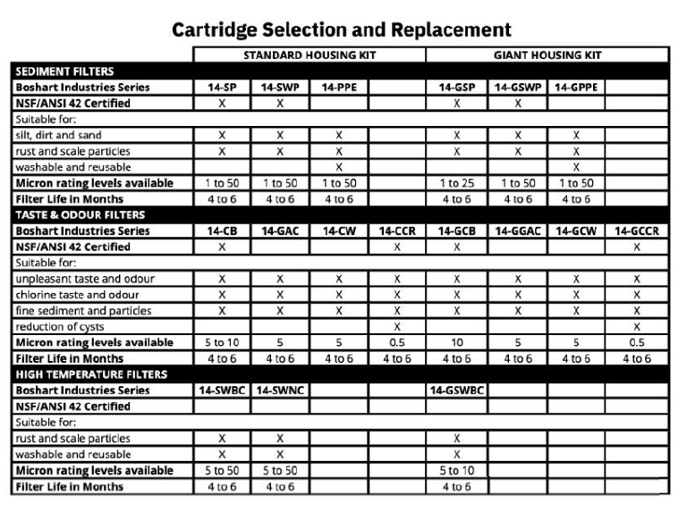
Filter Cartridge Replacement
Notes:
- Micron Rating: The lower the micron rating level, the smaller the particle size cartridge filters remove.
- Filter Life: Filter life varies depending on usage and water conditions. Changes in taste, color, and flow of the water being filtered are signs that replacement of the cartridge may be necessary.
- Flow Rates: Actual maximum flow rates versus pressure drop will depend on cartridge selections and fluid viscosity.
- Carbon Powder: An activated carbon cartridge may contain a small amount of carbon dust, and a newly installed cartridge should be flushed with sufficient water to remove the fines before using the water.
- Cellulose: Cartridges containing cellulose may seem to disintegrate, produce a “sewer” or “rotten egg” odor, or form a black precipitate due to a reaction with some types of harmless bacteria. If you notice any of the above problems while using cellulose cartridges, switch to a synthetic cartridge or consult the manufacturer.
Instructions
 Shut off inlet and outlet valves and depress the air release button on the housing to eliminate system pressure.
- Place a bucket directly underneath the filter housing to collect water.
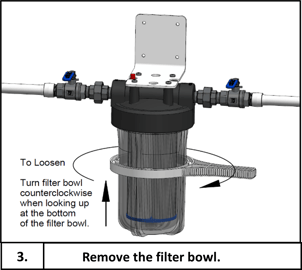
- Using a filter wrench, remove the bowl by gently unscrewing counter-clockwise.
- Remove and discard the used cartridge. Empty the filter bowl into the bucket.
- Remove O-rings and wipe clean of any dirt
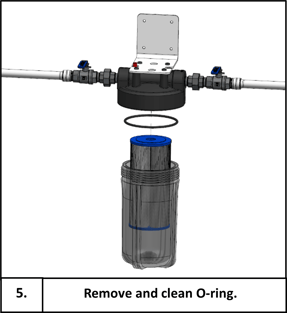 and lubricant. Inspect for damage and set aside. If O-ring is damaged, discard and replace it.
 - Fill the bowl 1/3 of the way with water and add 1 Tbsp (30mL) of bleach. Scrub thoroughly with a non-abrasive sponge or cloth to remove any build up of microbiological, rust, and scale particles. Rinse and ensure the O-ring groove seating area is free of dirt.
- Remove protective packaging from new cartridge and place it into the bowl, fitting it over the post.
- Lubricate new or cleaned O-ring with a silicone
 based lubricant and place it into the groove. Make sure it is seated level and evenly in the groove.
 - Install the bowl clockwise, turning slowly until the cartridge aligns with the post in the filter head. Hand tighten. Do not overtighten.
- Depress and continue to hold the red air release button while slowly opening the inlet valve as water fills the housing. Continue until water flows out of the release button. Open the outlet valve slowly to purge air from the line.
- Flush the system for several minutes before use. Check for leaks.
Troubleshooting
Leaks between cap and bottom of filer housing:
- Turn off water supply and press red air release button. Remove bottom of housing.
- Remove O-ring and inspect for knicks and damage. If the O-ring is damaged you will need to buy a replacement.
- Clean O-ring and O-ring groove. Lubricate O-ring with silicone based lubricant. Screw bottom of housing onto cap and hand-tighten. Do not over tighten.
- Turn on water supply. If leak persists, turn off water supply, and call customer service.
Leaks on inlet/outlet connections:
- Turn off water supply. For copper fittings, tighten nut snuggly, about ½ turn with a wrench.
- Turn on water supply. If leak persists, turn off water supply, and call customer service.
Additional Resources:
https://support.boshart.com/how-do-i-plumb-a-water-filter-bypass
https://support.boshart.com/how-to-replace-a-whole-house-water-filter-cartridge
https://support.boshart.com/filter-cartridge-alignment-tips-tricks
https://support.boshart.com/how-do-i-identify-what-filter-cartridge-i-have-in-my-water-filter
https://support.boshart.com/how-can-i-remove-a-water-filter-bowl-that-is-stuck