How to Replace a Whole House Water Filter Cartridge
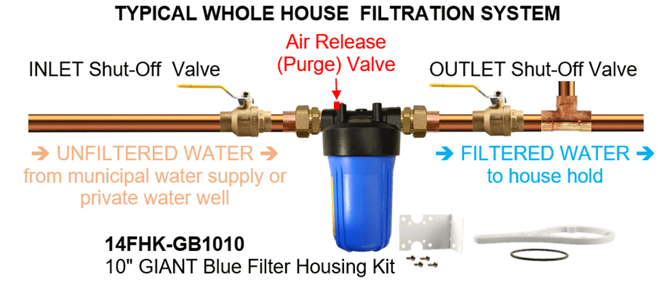
 A whole house filter application is where the filter housing filters all the water entering the residence. It is installed at the point of entry (POE) located AFTER the water meter, for municipal water, or the pressure tank, for private water or water well systems. It is installed BEFORE all water treatment, faucets or appliances including any additional point of use (POU) filtration units.

Instructions
#1 - Close the inlet shut-off valve.
#2 - Open a faucet close to the outlet shut off valve temporarily to reduce the system pressure inside the filter housing.
#3 - Close the outlet shut-off valve to ensure the water in the household plumbing system cannot drain back through the filter housing when the filter bowl is removed.
#4 - Place a towel and bucket directly under the filter housing to collect water that may spill out when removing the filter bowl.
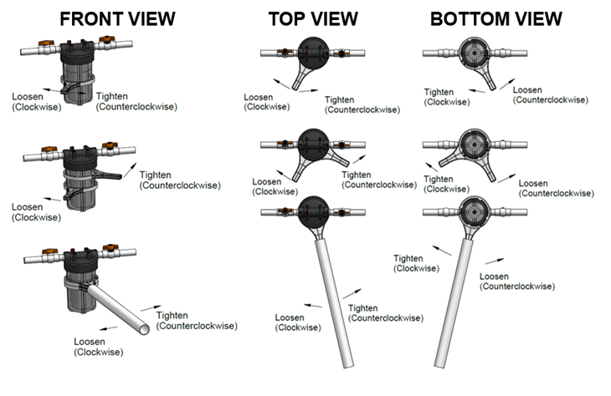
#5 - Using the filter wrench, remove the bowl by gently unscrewing counter-clockwise (to the left) if you are viewing the filter from the bottom or clockwise (to the right) if you are viewing the filter from the top. See the diagram below.

If the filter bowl is stuck, you can align a second filter wrench with the first and use a short pipe extension over the handles to apply more leverage and torque as shown in the diagram above.
#6 - Remove and discard the used cartridge. Empty the filter bowl into the bucket.
#7 - Remove the O-rings & wipe them clean of any lubricant. Inspect for damage and set aside. If an O-ring is damaged, discard and replace it.
#8 - Clean the filter bowl. To do this, fill the bowl 1/3 with water and add 1 Tbsp. (30 ml) of bleach. Scrub thoroughly with a non-abrasive sponge or cloth to remove any buildup of microbiological material, rust or scale particles, and rinse. Ensure the O-ring grooved seating area is free of dirt.
#9 - Remove the protective packaging from the new cartridge. Place the cartridge into the bowl, fitting it over the alignment post. NOTE: Soaking the cartridge in clean cold water can reduce the cloudiness caused by air bubbles after a filter cartridge is changed out.
#10 - Lubricate the new or cleaned O-ring with a silicone-based lubricant. Never use a petroleum based lubricant or jelly. Position the O-ring into the O-ring groove, making sure the O-ring is seated level and evenly in the groove.

#11 - Install the filter bowl by turning the bowl clockwise (to the right). Turn slowly until the cartridge aligns with the centering post in the filter head. Turn until hand tight. DO NOT OVERTIGHTEN. Often hand tight will achieve a watertight seal, if there is a slow drip, further tighten in small increments until the leakage stops.
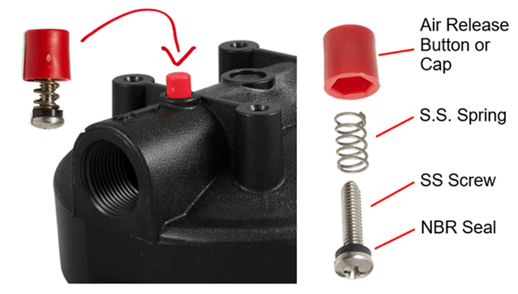
#12 - Depress and continue to hold the red air release button while slowly opening the shut off valve on the INLET side. As water fills the housing, air will escape from the release valve port. When you get some water coming out this indicates all the air has been purged. Release the button to close the release valve. Then open the shut off valve on the OUTLET side as well as the nearest faucet and slowly purge any air that may be trapped in the water filter and water lines on the outlet side. When no more air is being discharged close the faucet.

 #13- Flush the system for several minutes before use. The water may be cloudy for a few minutes or days until the trapped air is eliminated from the filter housing and filter cartridge. Recheck 5-10 minutes after pressurising to ensure the O-ring has seated properly and there is no leakage.
Additional Resources:
https://support.boshart.com/how-can-i-remove-a-water-filter-bowl-that-is-stuck
https://support.boshart.com/filter-cartridge-alignment-tips-tricks
https://support.boshart.com/my-water-is-cloudy-after-changing-my-water-filter-cartridge
https://support.boshart.com/can-sediment-filters-be-installed-between-the-pump-and-pressure-tank
https://support.boshart.com/how-do-i-plumb-a-water-filter-bypass
