How can I remove a water filter bowl that is stuck?
How can I remove a water filter bowl that is stuck?
If you have a potable water filtration system that uses sediment or taste and odor filter cartridges, you should be changing your filter cartridge every six months at minimum. 
Ordinarily, this is a relatively simple task, but if the filter bowl is stuck, it can take significant effort or multiple attempts before you can successfully remove it. Below are a few tips that will help however make sure to check out the tips on preventing a seized filter bowl at the end of this article to reduce the chance of the bowl being hard to loosen next time you need to change a cartridge!
#1 – Before increasing force… make sure to eliminate ALL internal pressure:
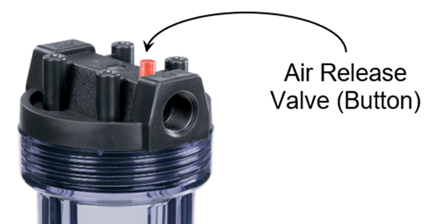
Before getting into loosening solutions, we need to address the most common issue which is failure to release the internal pressure before attempting to loosen the filter bowl. Often the internal water pressure is all that is causing the filter bowl to be difficult to loosen. Before increasing the torque as shown below, make sure the pressure has been eliminated. To do so the shut-off (ball) valve on the inlet side of the filter must be closed, then the pressure can be relieved by opening a faucet on the outlet side of the filter. The shut-off valve on the outlet side of the filter must be opened to allow the release of internal filter/line pressure. Once the pressure is eliminated, the shut-off (ball) valve on the outlet side of the filter can be closed to prevent all the water in the piping above the filter from back flowing when the filter bowl is removed. To be sure there is no internal pressure, press the “Air Release Valve” (typically a red button on the top of the filter body). There should not be any significant pressure. If the water squirts out with force it indicates that there is still some internal pressure present.

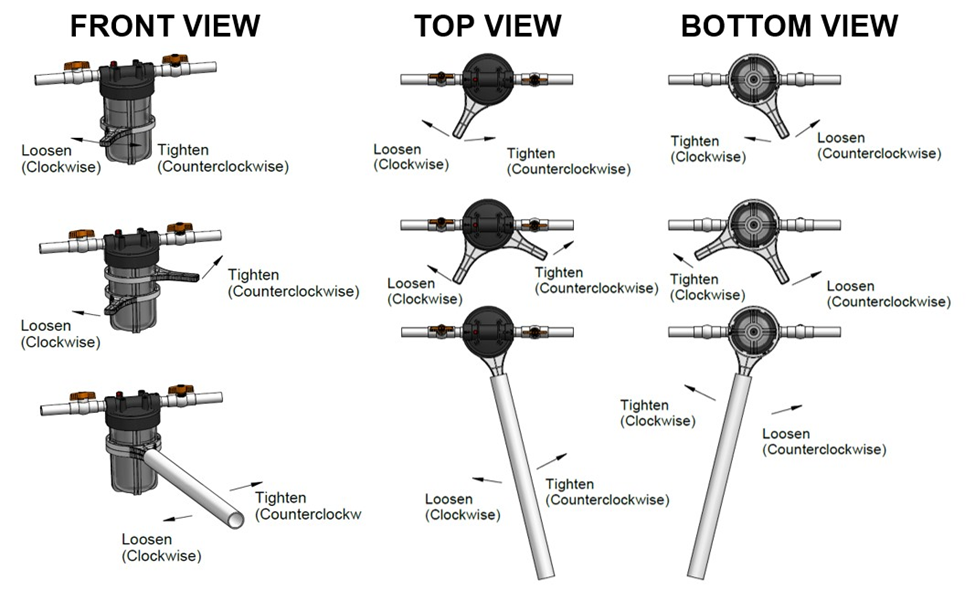
Also reconfirm you are turning the bowl in the proper direction for removal- counter-clockwise. Righty-tighty - lefty loosy as the saying goes. NOTE: the counter-clockwise rotation is based on looking at the filter bowl from the bottom not looking down on the filter body from the top!

If you are still having trouble removing it by hand or using the filter wrench supplied with the unit, there are a few other methods you can utilize to free the stuck bowl.
 CAUTION: Do not heat the plastic filter components! You will find numerous YouTube tips that suggest the use of heat from a hair dryer or a heat gun. Heating plastic components will degrade the structural integrity of the plastic. It has been known to result in stress cracking of the filter components. Clear filter bowls are more severely impacted than opaque “Blue” bowls but neither should be subjected to a heat source.
#2 – Increase the torque:
There are three options for applying increased torque to the stuck filter bowl,
Option #1 - Apply additional leverage by using a short extension on the filter wrench. Support the base of the unit by placing one hand on the bottom of the filter bowl and apply pressure turning the filter bowl in a counter-clockwise direction. NOTE: Depending on how seized the bowl has become the plastic filter wrench may not withstand the added force. See option 2B.
Option # 2 - Obtain a second filter wrench. With a second filter you have two options (refer to the diagram above):
A) Place the wrenches with the handles at 140 to 180 degrees from each other in a position where you can pull on one wrench while pushing on the other. This will provide significantly more torque to dislodge the stuck filter bowl and reduce the stress on the filter bracket or piping. NOTE: Depending on the location of the filter, it may not be possible to use this method due to space restrictions.B) Place both the wrenches with the handles in the same position. Apply additional leverage by using a short extension of pipe over both filter wrenches. This is a great option if the wrench was not rigid enough when attempting option 1.
Option # 3 - Use a Multi-Purpose Adjustable Belt Strap Wrench. The strap wrench will provide extra strength and will have a longer handle in most cases. Often using a simple plastic handle wrench with a rubber strap will be enough to loosen the bowl. However, there are more robust aluminum or nylon strap wrenches available at your local hardware store if a low-cost plastic wrench is not up to the task.

Depending on the space limitations due to the installation location, you may wish to use ratchet type filter wrench, often referred to as an oil filter wrench. These are designed to use with a standard socket ratchet or breaker bar. The ratchet is ideal for working in confined spaces.

Common Causes of stuck filter bowls:
The three most common causes why filter bowls are sometimes extremely hard to loosen are…
A) Lack of O-Ring lubrication - Failure to adequately lubricate the O-ring causes a number of issues. It creates friction making it difficult to properly tighten the bowl and obtain a watertight seal. When an O-ring is installed dry, the O-ring tends to adhere to the plastic on the filter body and bowl making it very difficult to remove the filter bowl after a 4- 6 month period.

B) Inappropriate use of petroleum based lubricants - Petroleum based lubricants being applied to the O-ring is another major problem. We often get reports that someone has used petroleum based lubricant such as Vaseline to lubricate the O-ring. Petroleum based lubricants cause the O-ring to swell. This expansion creates extremely high pressure between the filter body and the filter bowl. Only use a silicone O-ring lubricant on O-rings.
C) Simply overtightening - It is common that a filter bowl will be tightened way beyond the required torque to seal the filter bowl, especially is the O-ring has not been adequately lubricated. The filter bowl should be hand tightened and then wrench tightened another 1/8 to ¼ turn using the filter wrench. Then turn on the water and check for any leakage. If there is a slow drip, release the pressure and tighten the bowl a little further. Overtightening should be avoided!
Tips on preventing a seized filter bowl:
TIP #1 - Lubricate the O-ring with a silicone lubricant. A light application of the lube on the filter bowl threads can also provide protection against the threads binding.
TIP #2 - Do not over tighten the bowl. Resist the temptation to tighten the filter bowl as tight as you can.
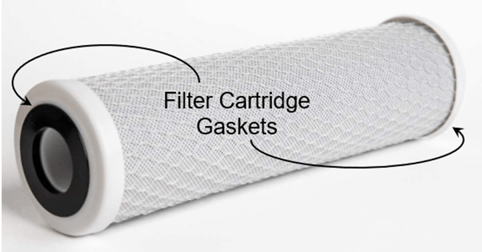
TIP #3 - Make sure that no old filter cartridge gaskets are left in the bottom of the filter bowl. Some types of filter cartridges have rubber gaskets on each end to seal the cartridge to the round knife seats in the filter housing. From time to time the lower sealing gasket detaches from the filter cartridge and it creates problems with getting the filter bowl to seal.

When this occurs, the instinct is to keep tightening the bowl with more and more force to get the unit to stop leaking by compacting the gasket. This can result in stress cracking of the filter bowl, or it being almost impossible to get the filer bowl loosened off when it comes time to change the cartridge.
Additional Resources
https://support.boshart.com/how-to-replace-a-whole-house-water-filter-cartridge
