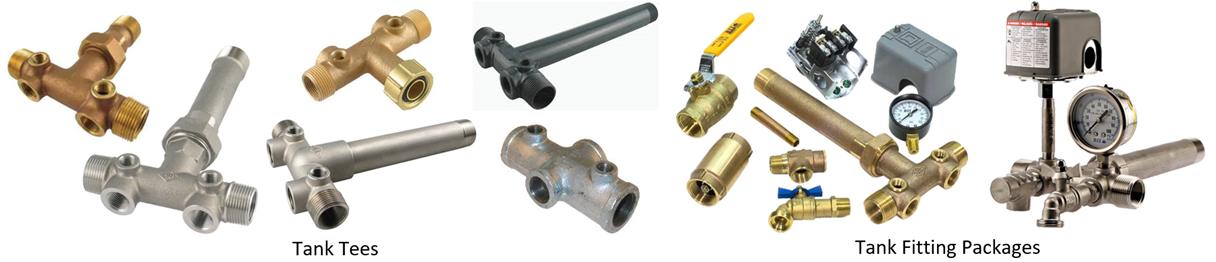
There are three key things that you must know about your tank before selecting a tank tee. In addition, this article has some information on selecting union tank tees vs. solid (non-union) tank tees and the pros and cons of the various materials available. Selecting the right tank tee is the starting point for ordering a tank tee fittings package, which is covered in a separate article (https://support.boshart.com/selecting-a-tank-fitting-package).
#1 – Tank Connection Specification
 We are going to start based on the assumption that the tank you have purchased is of adequate size. The purpose of a pressure tank is to maintain pressure in the system and give the pump a break. This way, the pump does not need to run constantly to remain at system pressure. While a pressure tank can appear costly upfront, do not undersize your tank as it will cost you in the long run. Sizing the pump and tank to provide a suitable run time will result in less starts and stops for the pump motor, extending its life expectancy, reducing maintenance and energy costs. Consult your tank manufacturer for tank sizing information.
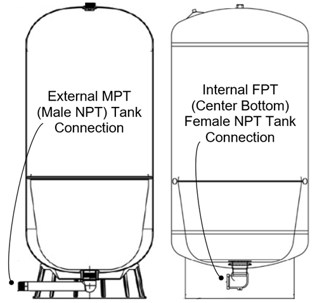
The tank connections are typically 1” FPT or 1-1/4” FPT (female NPT connections) for higher capacity tanks. However, some models have a 1” MPT or 1-1/4” MPT (male NPT connections).
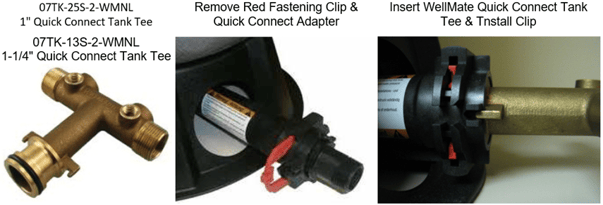
There are also tanks such as the WELL MATE QUICK CONNECT that have a specialized adapter which has an MPT connection. These Well Mate tanks can be installed using either female tank tees attached to the adapter, or there are special tank tees which connect directly to the tank without the adapter.
https://support.boshart.com/wellmate-wm-series-quick-connect-tank-tee-installation-instructions
The tank tee should be matched to the tank’s connection size, it is not recommended to reduce the size of the tank tee. The piping from the well to the tank and the tank tee should be sized to maintain a flow velocity of 5 fps (feet per second), 7 fps would be the maximum. The chart below provides the GPM (gallons per minute) range in USG. Ideally a 1” tank connection should only be used on a pump with 13.5 GPM or less capacity. If your pump delivers over 14 GPM it is best to increase the tank connection, piping, and tee size from 1” up to 1-1/4”.

#2 – Tank Connection Fitting Material
Depending on the brand of tank that you are selling or have purchased, the connection fitting may be a different material, best practice is to avoid joining dissimilar metals when possible. Possible tank connection materials are malleable iron, brass, stainless steel or plastic. Selecting a tank tee of the same material will reduce the risk of galvanic corrosion. Plastic connections eliminate all concerns about tank material. Joining brass and stainless steel is not going to cause a problem as they are close on the galvanic corrosion chart, both being noble metals. When it comes to stainless steel (301, 304 and 310) and brass, they are only two metals apart, which means they can be connected with minimal risk of galvanic corrosion.
Brand / Model System connection
Flexcon PROLITE - CSS Series Stainless Steel
Flexcon FLEXLITE - FL Series Rigid Sch. 80 PVC (MPT)
Flexcon WELL-RITE - WR Series Stainless Steel
Pentair – WELLMATE – WM Series High Impact PVC (Quick Connect Adapter MPT)
Pentair – WELLMATE – WM-HP Low Profile Series High Impact PVC (Quick Connect Adapter MPT)
Pentair – FLOTEC – FP Series Plastic
Pentair – PRO-SOURCE – PSC Series Stainless Steel
Pentair – SIMER - VT Series Plastic
Amtrol - WELL-X-TROL - WX-100, 200 & 300 Series Stainless Steel
Amtrol – WELL-X-TROL - WX-100P, 200P & 300P Series Stainless Steel (MPT Side Connection)
Amtrol – WATERWORKER HT Series Stainless Steel Inert
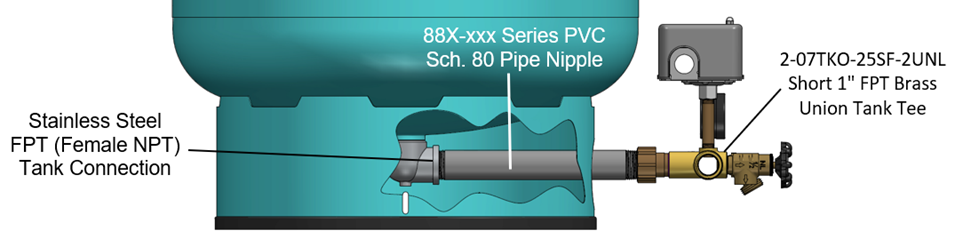
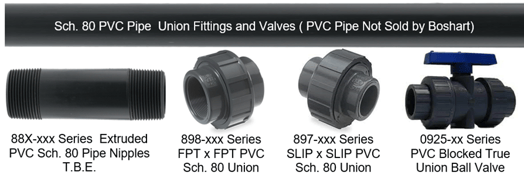
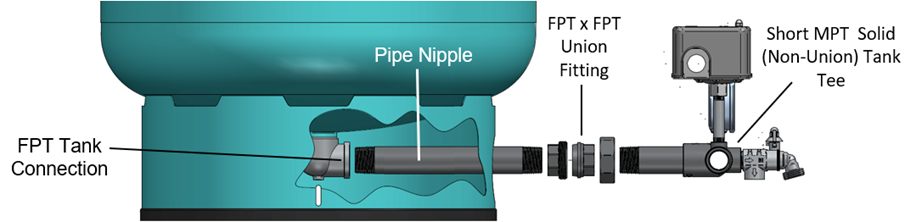
Galvanic Corrosion Solution – If you use a brass tank tee which is easier to work with, and easy to obtain a positive seal, you can avoid all risk of accelerated corrosion between dissimilar metals when connecting to a tank that has a stainless connection by installing a Sch. 80 PVC pipe nipple between the tank connection and the brass tank tee. You simply select the appropriate length of PVC nipple with a short female union tank tee to achieve the desired CEL (center end length).
Installing PVC fittings or unions in the line connections can solve issues in joining dissimilar metals when connecting to existing plumbing. In addition, installing unions at the inlet pipe from the well will make the change out of a check valve (if one is installed at the tank tee) or a shut-off valve in the line to the household plumbing system easy when a replacement is needed.
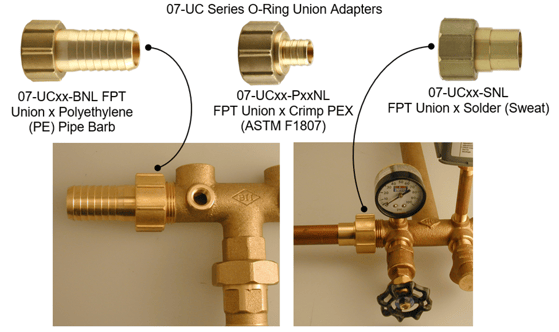
You may want to consider installing the brass 07UC series union fittings on the line connections of a brass tank tee. These are ideal for the quick disconnection of a tank and are very popular for tank installations in cottage areas where winterization of seasonal systems is required.
#3 – Measurement from the tank connection to the outside diameter of the tank
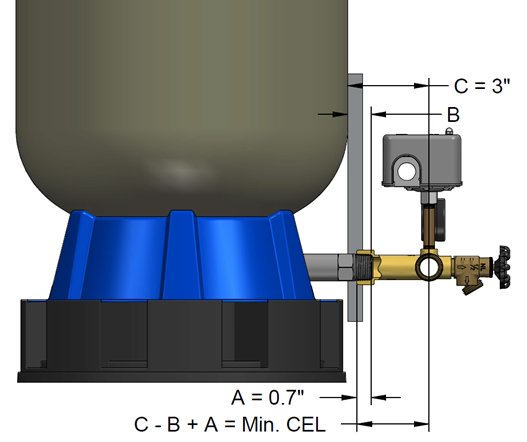
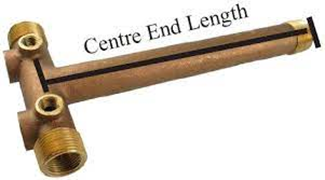 Depending on the brand of tank that you are selling or have purchased the dimensions may vary. The information on how to determine the proper length of tank tee is universal. It simplifies how to measure the tank to determine the proper tank tee center end length (CEL), which is the critical dimension for tank tee selection. Overall length is not a relevant measurement. It is critical that the “C” dimension of 3” as detailed in the diagram below is maintained so that the pressure switch has sufficient room to rotate without hitting the tank when the switch requires change out. Failure to keep this dimension will result in extensive labor if the pressure switch fails.
How to measure your tank to determine the minimum tank tee CEL (center end length) required:
Center Bottom Connection Tanks
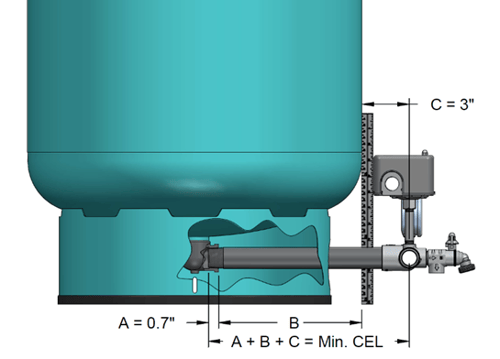 Using a form of straight edge pressed against the tank wall perpendicular to the floor, measure the distance from the edge of the connection on the tank to the outside of the tank. This is dimension “B” (see diagram to the right).
To determine the minimum CEL you will add “A”, ¾” for thread engagement, plus “B” plus “C” which is the minimum distance required for the pressure switch to be installed or removed. Note: this takes into consideration the swing of the enclosure due to the connection being offset on the Square D 9013FSG2 or Boshart PS02 Series pressure switches. This dimension also covers the heavy-duty Square D pressure switch 9013GSG2 and 9013GHG2 which have larger enclosures but a centered connection which requires slightly less clearance.
External Connection Tanks
 Many brands of tanks which are plumbed to have the connection extended to the tanks base will require a 4” to 4-1/2” CEL tank tee.
Which brings us to a great question: Where are tank tees with shorter CEL dimensions used?
Some brands of tanks, Pentair’s FLEX-LITE for example, has the tank connection protruding through the base, out further than the tanks diameter. With the longer tank connection, shorter tank tees with CELs ranging from 3” to 3-5/8” can be used, as they still provide enough clearance for the installation of a pressure switch. To determine the minimum CEL you will subtract the protrusion dimension “B” from “C” which is the minimum distance required and add “A” 0.70” for thread engagement.
Below are some tank tee options for tanks that have protruding tank connections.
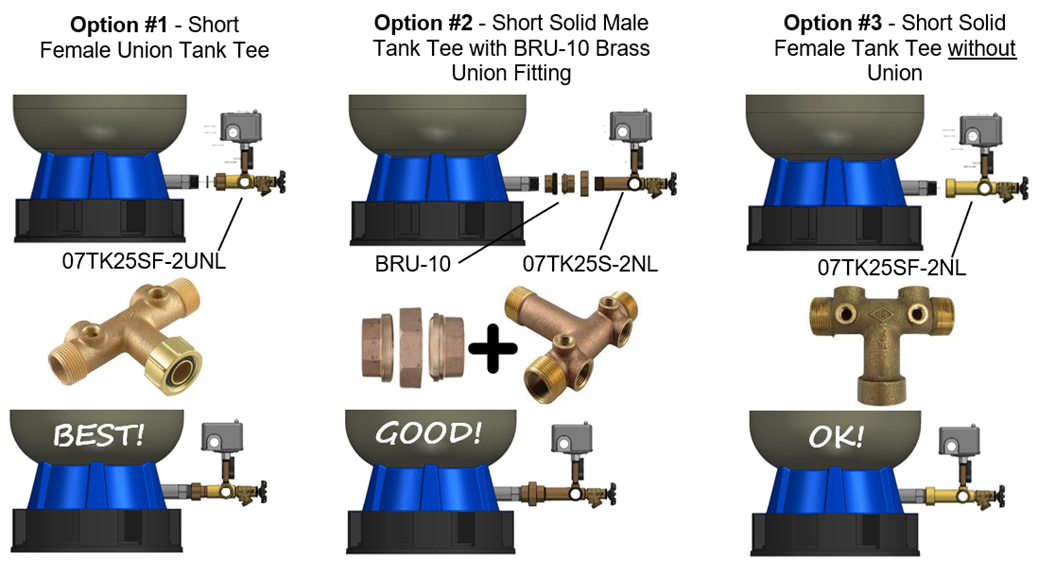
In addition, some water well contractors find it beneficial to keep less inventory on the service trucks. The use of short tank tees is very universal, simplifying tank tee selection and adapting to different tanks by selecting an appropriate length of pipe nipple, and using couplings or unions to make the connection to the tank. The use of standard pipe fittings makes it possible to adapt a short 1” or 1-1/4” tee to any make or model of pressure tank regardless of the tank's diameter or connection type. This reduces the chance of showing up to a job and not having the proper CEL or MPT (male) vs. FPT (female) connection type to fit the tank.
Plumbing and Well Construction Codes
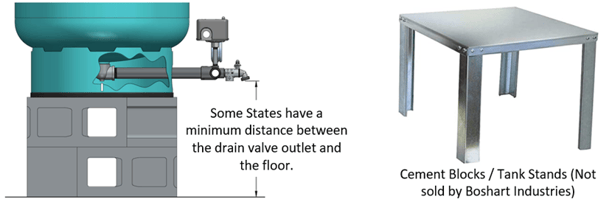
Always make sure to adhere to all applicable well construction and plumbing codes in your area. Some areas stipulate that the tank tee must be a set distance off the floor (typically 12” but this may vary from state to state) so that a water sample can be taken from the sediment faucet, hose bibb or sampling valve on the tank tee. To raise the tank off the floor you can purchase a tank stand to elevate the tank, or a simple solution is to use cement blocks. Raising the tank is not a bad idea whether it is required by code or not, as it elevates the connection to a nice working height and also positions the valves and pressure switch to a nice height for easy adjustment or replacement. In addition, the pressure gauge will be easier to read.
In most areas the drain valve is a hose bibb or sediment faucet, however in some areas code mandates that you must use a sampling faucet. This is simply a valve that does not have a garden hose thread (GHT) for hose attachment as per the SSSF52 and 0874 series.
Material Selection
Stainless Steel Tank Tees
Stainless steel tank tees are more price competitive than no lead bronze and have replaced bronze (red brass) tank tees since the introduction of no lead requirements in 2014. They are typically cast from 304 stainless steel which is incredibly durable and very corrosion resistant. Although stainless tees are more expensive than brass, they do not contain zinc, alleviating problems with dezincification that can occur when using brass alloy tank tees in aggressive water conditions. Another advantage is the extremely high strength of stainless steel. This virtually eliminates all risk of stress cracking when threading into female connections. The downside to stainless steel is that it is harder to work with and if proper installation methods are not used, the chance of a leaking connection is much higher.
Following best practices for making stainless steel connections will reduce the chance of galling or a leaky connection. Boshart suggests the use of both P.T.F.E. (Polytetrafluoroethylene) Thread Seal Tape and Gray Magic Thread Sealing Compound (or any thread sealant that is specially formulated for stainless connections to reduce the chance of galling).
https://support.boshart.com/making-a-leak-proof-stainless-steel-threaded-connection
Brass Alloy Tank Tees
Brass material is softer and much easier to obtain leak free connections. There is no issues with galling which can be an issue with stainless joints. For these reasons brass is an excellent choice for an inexperienced DIY plumber or plumbers who are not experienced with working with SS fittings. Brass tank tees are less expensive and are suited for installations in most areas. However, brass alloys are not as corrosion resistant as stainless steel, therefore for installations in areas where the water is highly corrosive to brass, it is recommended to upgrade to stainless steel.
PVC Tank Tees
PVC tank tees are a competitive option compared to stainless steel, brass, and galvanized materials. They are extremely resistant to corrosion, but they may not be as durable as metal tank tees, nor are there many configurations available. They may be a very suitable alternative when proper PVC installation practices are followed. The use of a high-quality thread sealant paste rather than PTFE thread sealant tape and avoiding overtightening will reduce the risk of over stressing the female NPT accessory ports. The downside is that they are not currently available in a union design.
Galvanized Tank Tees
Galvanized tees are less expensive than both stainless steel and brass tank tees. Their use is typically limited to installations on galvanized pressure tanks without a bladder. Galvanized tees are selected to eliminate the risk of galvanic corrosion between dissimilar metals. Galvanized tank tees used in conjunction with galvanized nipples and fittings solves the problem. It is important to note that some plumbing codes do not allow the use of galvanized fittings and nipples. One must verify that galvanized tank tees meet all the applicable plumbing code requirements.
Union vs. Non-Union
The choice is yours, however in our opinion there is no debate, the best way to go is to install a union tank tee!
It is not a matter of if, but rather when your pre-charged pressure tank, regardless of make or model, will come to the end of its life. The few extra dollars invested to purchase a union tee will pay you back many times over in saved time and labor when it comes time to replace the pressure tank. The union allows you to easily disconnect the tank, leaving all the other plumbing connections and electrical wiring intact. Simply drain all the water from the tank, disconnect the tank at the union, lift out the tank, remove the leg portion by unthreading (counterclockwise rotation) from the old tank, and install it on the new tank. Place the tank back into position and reconnect using the union nut. The difference will be 20-30 minutes vs. hours.
In Conclusion
We trust this information has been helpful, but you may want to read more about other things to take into account when installing a tank tee, such as what to consider when selecting a pressure switch or relief valve as well as the relationship between the pre-charge pressure rating of a tank and the pressure switch cut-in. Often when a new tank tee or pressure switch is installed these settings get messed up and the system will not operate. In cases where a new pressure switch with a higher cut-in / cut-out setting is selected, a change to the factory setting of the relief valve is required. For more information check out the article at the link below:
It is crucial that you always refer to and follow the manufacturer's instructions, and all local plumbing, well construction, and building codes.