Installation Instructions:

Warning: GCC compression couplings do not restrain against axial pipe movement. Proper anchoring is required to prevent pipe pullout. Failure to anchor or improper anchoring can result in dangerous pipe content escape, property damage, serious injury or death. Read the installation instructions prior to installation.
1. In the area where the gaskets will seat, clean the pipe thoroughly. For future use, place a reference mark on the pipe a minimum of 3” from the end. This will ensure that the coupling is properly centered over the opening between the pipe ends.
Note: On conducting type compression couplings (protected gaskets), the pipe should be cleaned to bare metal to ensure electrical conductivity.
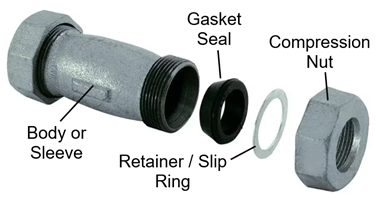
2. Loosen the compression nuts until the gaskets are free.
 3. Lubricate the gaskets and pipe ends with water, soap solution or another suitable lubricant.
4. Push the pipe ends into the coupling. Note the reference mark for proper centering on the pipe. Pipe ends must be a minimum of 1/2” past the tip of the gasket to provide an adequate seal. A gap of 1/4” between pipe ends is recommended.
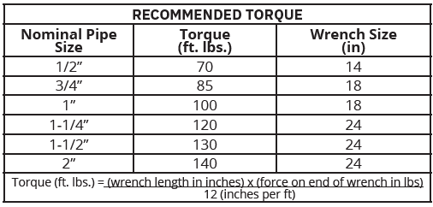
5. Tighten the nuts sufficiently to prevent leakage. The table below provides recommended torque and wrench sizes. When tightening, ensure the nuts are being rotated. DO NOT rotate the sleeve while tightening the compression nuts.
Additional Resources:
https://support.boshart.com/can-the-gcc-xx-series-compression-coupling-be-used-for-gas-line-repair
https://support.boshart.com/do-you-carry-dresser-couplings