 Thank you for purchasing a BOSHART Industries YHSS series yard hydrant!
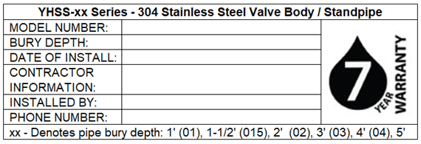
We are confident that with the proper installation it will give you years of trouble-free use with little maintenance. We recommend you record the model number, bury depth, and the installation date in the space provided below and keep these instructions for future reference.
What You Will Need for the Installation – Tools and Accessories

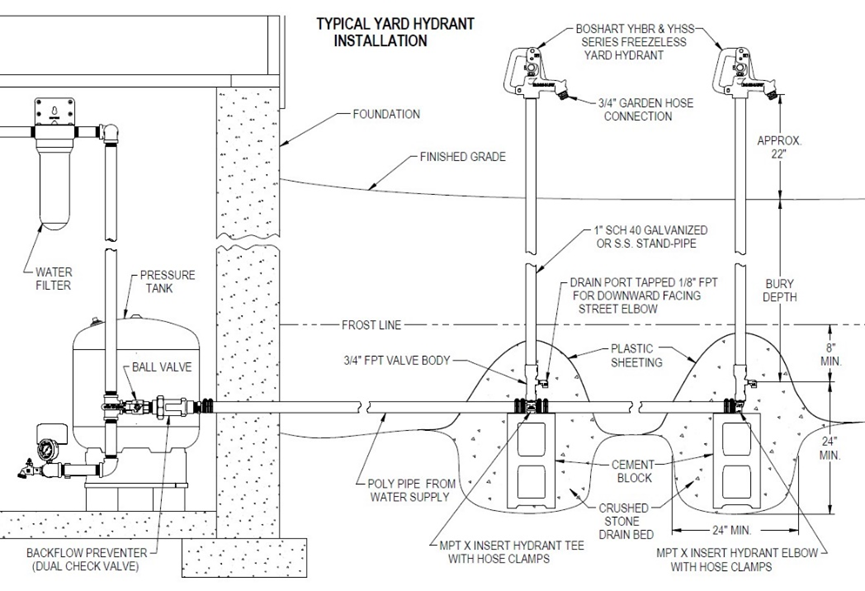
Best Practices & Installation Diagram:
- The installation of a shut off (ball valve) and a dual check / back flow preventor between the potable water supply source and the yard hydrant(s) is best practice. Failure to install a shut off will make servicing more difficult. The back flow preventor will protect your potable water system from contamination due to back siphonage.
- Use both anti-galling S.S. thread compound and P.T.F.E. tape when making stainless steel threaded connections to ensure a leak proof seal. For more information visit: https://support.boshart.com/making-a-leak-proof-stainless-steel-threaded-connection.
Installation Instructions:
 #1 - First be sure the water line on which the hydrant is to be installed has been thoroughly flushed to wash out any sand or foreign particles. Boshart will not warrant or accept any responsibility for issues resulting from foreign debris due to the water line not being flushed out prior to attachment of the hydrant.
#2 - Prepare a hole that is approximately 24 inches or more in diameter and below the frost line. It is a good idea to put a large patio stone or cement block under the hydrant; this will prevent the hydrant from settling.
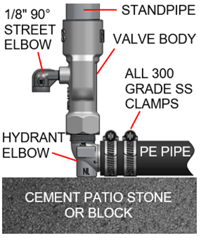
#3 – Install the 1/8” Street Elbow provided in the installation package. Threading it into the 1/8” FPT drain port of the valve body turning it clockwise. Make sure the opening is facing directly in the downward orientation. The elbow will safeguard against any foreign debris getting into and potentially clogging the drain port when back filling or from sand or silt that may enter the crushed / washed stone drainage bed over many years of service.
 #4 - Make sure that the hydrant valve body is installed a minimum of 8 inches below the frost line. Put a sufficient quantity of crushed or washed stone around and above the drain port of the hydrant, this will permit proper drainage.
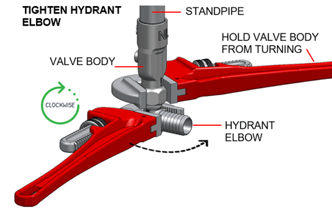
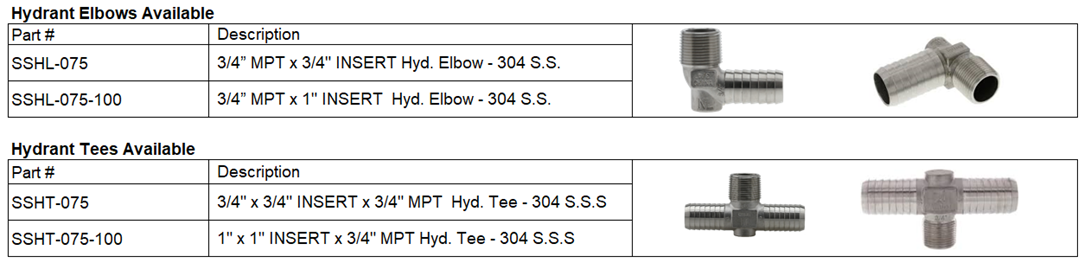
#5 - Connect the hydrant to the water line using appropriate fittings. Boshart hydrant elbows and tees are available at your local dealer (see back page for more information). When tightening the fitting, be sure to hold the valve body with a pipe wrench to ensure it does not screw further onto the hydrant standpipe; this would change the factory adjustment of the plunger.
IMPORTANT: DO NOT BACKFILL HOLE UNTIL ALL TESTS HAVE BEEN SUCCESSFULLY PERFORMED.
#6 - Turn on the water supply to the yard hydrant. Then turn on the hydrant by raising the handle to let the water flow, and thoroughly flush the supply line and hydrant to ensure there is no foreign debris left in the line.
#7 - Slowly close the hydrant, the water flow should stop and the water in the standpipe will drain out of the 1/8” drain port and will stop when the pipe is empty (approximately ½ to 1 minute depending on the bury depth).
#8 - If the hydrant is not working properly, refer to the adjustment section below. Do not proceed unless the hydrant is working properly!
#9 – With the hydrant closed and full pressure in the supply line, check all connections for leaks. Do not proceed if any leakage is detected at any connection.
#10 – When steps 9 & 10 have been fully tested, the hydrant is working properly, and there is no leaking at the connections, you can then start placing 24 inches or more of crushed or washed stone into the bottom of the hole. Fill the hole to a minimum of 8 inches above the drain port. Boshart will not accept any responsibility for digging up the hydrant if the installer fails to flush the line and check for proper operation and connections before starting the backfilling process.
 #11 – Place a thick layer of plastic sheet (pond liner) or landscaping cloth over the crushed stone to prevent the soil, which will be back filled on top of the stone drain bed, from infiltrating into the stone. This could eventually clog the drain bed with silt sand or clay.
#12 – Back fill with the soil on top of the liner while maintaining the vertical position of the standpipe, pack the soil to ensure the pipe will remain in the desired position.
#13 – Install the flow adjustment thumb bolt. Installation complete!
 Adjustment: If the hydrant will not shut off completely, the plunger (N) in the bottom of the hydrant can be lowered by raising the point of contact of the square head set screw (H) on the operating rod (D).
CAUTIONS
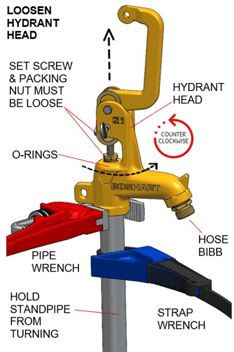
#1 - The brass packing nut (F) located on the head (A) of the hydrant has been factory adjusted. If leakage should occur, it may be necessary to slightly tighten the brass packing nut (F). Do not over tighten the brass packing nut (F); damage may occur to inner O-rings (E).
#2 - Do not leave a hose attached to hose bibb in freezing temperatures as it may prevent proper drainage of the hydrant’s standpipe.
#3 - If the hose is attached to the hose bibb of the hydrant when the hydrant is shut off, back siphoning can occur if the end of hose is left in the container of liquid. The end of the hose must be left open to the air so the hydrant can drain back.
#4 - In the event that the hydrant head (A) must be removed to replace a plunger (N), DO NOT place a pipe wrench on the stainless-steel pipe (P). This will cause damage to the “passive layer”, a thin layer of chromium oxide, on the surface of the stainless steel. To prevent the standpipe (P) from turning, use a strap wrench; this should also be followed when tightening.
Replacement Parts:
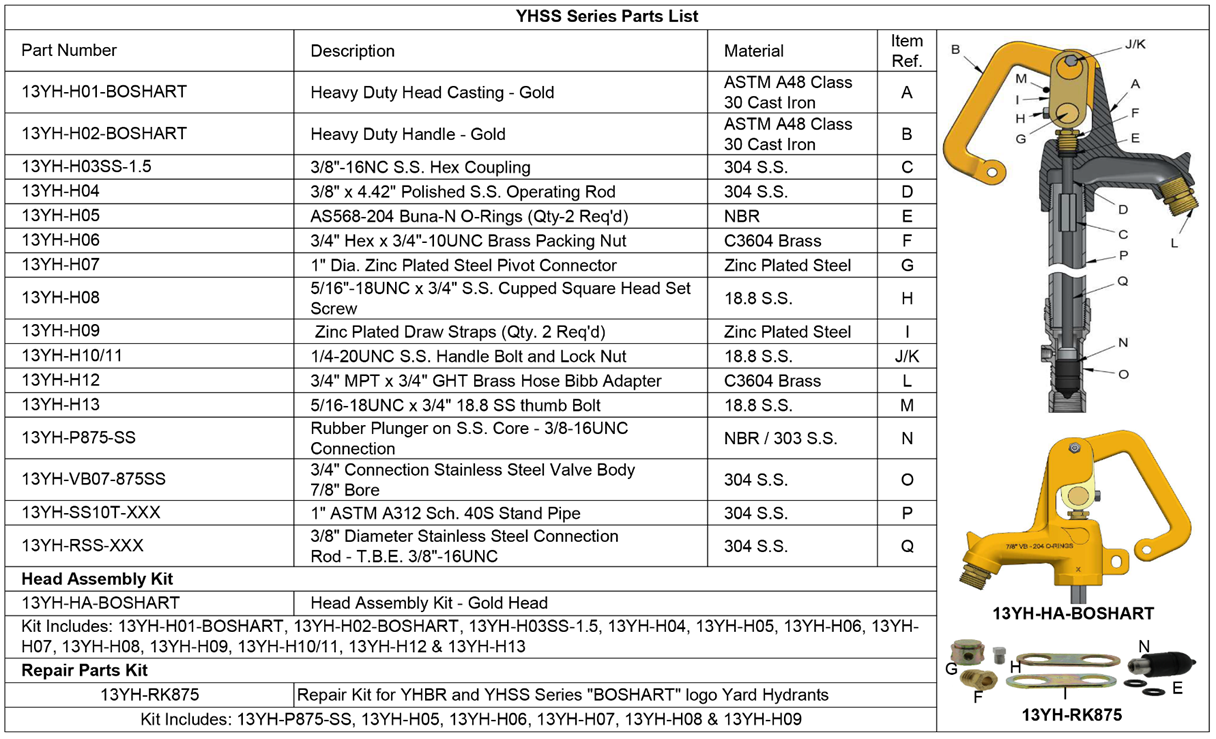
 Plunger Replacement: In the event that the plunger (N) needs changing, first raise the handle to the fully open position, then loosen the set screw (H), place a wrench on the hydrant head hex (A), and unscrew by turning counter clockwise. Hold the standpipe with a strap wrench so it does not damage the pipe coating or stress the buried connections. Place vise-grips on the hex coupling (C) and pull the connecting rod (Q) and plunger out of the valve body. Replace with a new plunger and re-assemble the unit. Re-set the operating rod and plunger adjustment and tighten the set screw (H).
Repair Instructions: https://support.boshart.com/how-to-adjust-or-repair-boshart-yhss-series-yard-hydrant.
Installation Instructions: https://support.boshart.com/how-do-i-install-a-boshart-yhss-series-yard-hydrant
Installation Accessories: An assortment of hydrant elbows and tees are available, see your local dealer.
BOSHART INDUSTRIES WARRANTY
 Boshart Industries warranties this product to be free of defects in material and workmanship for a period of seven years from the date of purchase. The warranty covers the replacement of the defective product or parts only and does not include damage or labour costs incurred. Faulty installation, abuse and / or misuse of the product in a manner that is not intended voids this warranty.
Boshart Industries will issue credit or replace the product on warranty claims upon confirming the validity of the warranty claim. Boshart Industries reserves the right to request that any or all products being claimed for warranty be returned for inspection. All warranty claims must be made through the Wholesaler/Dealer where the product was purchased from.
Under no circumstances will Boshart be liable for expenses necessary to remove or reinstall the hydrant or for any damages to other property or equipment resulting from the removal or installation of such product.
Additional Resources:
For additional information on yard hydrant topics you will find a number of helpful articles on our website (https://boshart.com/). Click on the “EDUCATION” tab on the home page which will open a drop down menu with a “KNOWLEDGEBASE” tab. Clicking on this tab will take you to a search bar (https://support.boshart.com/). This site has articles on a wide range of products carried by Boshart. Clicking on “Yard Hydrants” will take you to a list of all the additional yard hydrant resources or you can simply follow this link: https://support.boshart.com/yard-hydrants.

https://support.boshart.com/how-do-i-install-a-boshart-yhbr-series-yard-hydrant