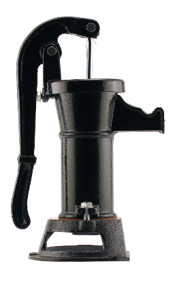
Hand Pump design has not changed significantly in more than a century. They are great for drawing water from shallow wells with a water level of less than 20 feet (25 feet max. at sea level) from the bottom of the intake pipe where the water is being drawn from.
These shallow well hand pumps are also commonly used to pump water from cisterns, rain barrels, and ponds. They are also used for non-working decorative water features with pond pumps (internal valve mechanisms removed). They are quite easy to install and can provide decades of trouble-free use with minimal maintenance.
If you need to pump from deeper than 25 ft., see the article at the link below:
https://support.boshart.com/can-a-19-hp-hand-pump-be-used-to-pump-water-from-deeper-than-25-feet
Pump Operation
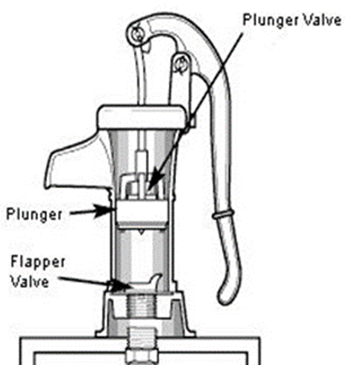 The cylinder holds two valves: a plunger valve and a weighted flapper valve. The handle moves the plunger assembly up and down inside the cylinder. As the handle is pushed downwards, the plunger moves up, creating a vacuum, causing the flapper valve at the bottom base to open and water is pulled into the cylinder. When the plunger reaches the top of the stroke, the weighted flapper valve closes due to the force of gravity, trapping the water in the cylinder. As the handle is lifted the plunger moves downward, and the plunger valve opens allowing trapped water to flow up through the plunger, the water remains in the cylinder. Then, as the handle is pushed downward raising the plunger in the second stroke, the cylinder is refilled with water from the well, and the water above the plunger valve in the cylinder is forced out of the spout. Therefore, steady pumping of the handle creates a continuous flow of water at a rate of about 1 gallon for every 10 strokes.
- Shallow pitcher pumps will pump water from a water level of up 20 feet.
- They can be installed on a well, a cistern or a barrel.
- Deduct from the allowable suction lift of 20 feet, one foot for every 50 feet of horizontal pipe distance and one foot for every 1000 feet of elevation above sea level.
Drop Pipe Installation
The drop pipe can be made of galvanized steel pipe, schedule 40 PVC pipe, or poly (PE) pipe. A 1-1/4" MPT pipe thread is required on at least one end. With PVC pipe you will need a 1-1/4" MPT male x Slip adapter to transition from the hand pump connection to your PVC pipe. With steel pipe you will need a 1-1/4" MPT pipe with threads. For poly pipe you will need a 1-1/4" male MPT x INSERT adapter and two 1-1/4" all 300 grade stainless steel gear clamps. You can use almost any kind of potable (drinking water) grade pipe.
- Apply a quality thread sealant such as P.T.F.E. thread seal tape or thread sealing compound such as Gray Magic on all pipe threads.
- Thread the drop-pipe or adapter into the 1-1/4” FPT connection at bottom of the pump (the drop pipe should be the same size as the connections on the pump). Tighten the drop pipe enough to prevent leaks. All pipe joints in the suction pipe MUST be airtight as well as watertight. If the suction pipe can suck air, the pump will lose prime and will not be able to draw water from the well.
- If using PE plastic pipe secure the pipe with 2 all 300 grade stainless steel clamps
- The drop pipe should extend at least 5’ below the actual pumping level ensuring the intake of the drop pipe is submerged at least 5 feet.
- When running pipe horizontally, you will need to deduct one foot of lift for every 50 feet of horizontal distance.
Resources:
https://support.boshart.com/making-npt-connections
https://support.boshart.com/how-to-apply-ptfe-thread-seal-tape
Priming the Pump
Never operate the pump dry. Operating the pump without water may cause damage to the cup leather. ALWAYS fill the pump cylinder with water before starting to pump. CAUTION: The pump handle may fly up when released during the downstroke.
- To prime the pump, pour water in the top of the pump until it runs out of the spout.
- Wait 7-10 minutes until the cup leather absorbs water and swells enough to contact the pump cylinder wall.
- Raise and lower the handle in short strokes to draw water from the well until the drop (suction) pipe is filled with water. When it is full, the pump is primed.
- If necessary, add more water. Any leak on the suction side will prevent the pump from priming.
Installation of a Foot Valve
The installation of a foot valve will maintain permanent prime. This is a common practice if the water level is down 10 feet or more. However, if a foot valve is installed you must take preventative actions to ensure the pump does not freeze (see below for freezing protection.)
Freezing Weather
In freezing weather, the internal flapper valve and plunger (both are made of leather or composite material) may freeze to the pump cylinder wall. If you start pumping, they may get damaged, making the pump inoperable. If you suspect that your pump is frozen, thaw it out by pouring hot water into the top and letting it sit for a few minutes. If this does not work, you may have to open the pump and free the individual components by hand. In some cases, you may have to remove the pump by unthreading it from the connector, getting it inside to a warm spot, and soaking it in a tub of hot water.
Freezing Protection
You do not need to use a foot valve with the hand pitcher pump. However, if you use it frequently and want water without priming, you can install a foot valve at the bottom end of the pipe. The use of a foot valve will maintain permanent prime. We suggest a foot valve if your water is 10' down or deeper. A foot valve is a one-way valve that lets water in but not back out again, so it keeps the pipe full of water. The problem comes with freezing weather. When water in the pipe freezes the whole apparatus is rendered inoperable and the pipe could possibly split.
- If you do not use a foot valve you can protect the pump against freezing by lifting the pump handle as high as possible. The check valve (at the lower end of the cylinder) will tilt when the plunger is forced down on top of the valve. Tilting the check valve allows the pump and suction line to drain (the handle must remain in the up position).
- If you use a foot valve, then you MUST remove the pump from the well and keep the water in the well below the frost line. This is the only way you can prevent the pump and pipe from freezing!
Troubleshooting
If your pump will not work:
- Open the pump and make sure that the flapper valve is not damaged and that it is centered over the hole.
- Check to see that the valve in the top of the plunger (a cone-shaped weight) is not stuck. If it is, manually free it.
- Reassemble the body and ensure the bolts are tightened enough to prevent air leakage around the base.
- Check for leaks at all connections and joints. Replace any worn or defective components.
- Make sure the pipe intake end is submerged 5 feet below the water. Water levels change throughout the year, so make sure your pipe is long enough to accommodate this variation.
- Use clean water when priming. The plunger seal is made of leather and will expand as it absorbs water. Let the cup leather absorb water for a few hours and try again.
- Make sure you are not trying to lift the water more than 20' (measured from the water surface to the spout). NOTE: In higher elevations, the distance water can be lifted is reduced. At sea level and under ideal conditions, these pumps will lift to a maximum of 20', but higher elevations will reduce the lift.
General Notes:
- Leather seals are always preserved with oil, which may cause an oily film or smell during the first few weeks of use.
- The length of the pipe does not make the pumping any different, only the level of the water.
- Never use foot valve unless you protect the pump from freezing.
- Pumps will self-drain if the handle is left in the up position and the foot valve is removed.
- Your local codes or health department may require a sealed system. This will keep the water sanitary. Check local code requirements.
Maintenance and Repair
Periodically inspect the pump for worn components and do not allow the pump to freeze. Damage due to freezing will void the warranty.
For more information on replacement parts visit the link below:
https://support.boshart.com/what-replacemnt-parts-are-avalable-for-the-19-hp-cast-iron-hand-pump
Replacing the Cup Leather
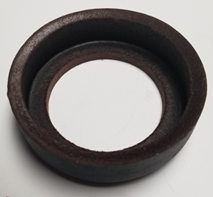 Loosen the cap screw on the pump cap and lift the plunger assembly out of the pump.
- Unscrew the cup leather holder.
- Remove the old cup leather and put on the new cup leather.
- Screw the leather cup holder back into its original position.
- Reinstall the plunger assembly and cap.
- Insert the cap screw and tighten.
Replacing the Valve Leather
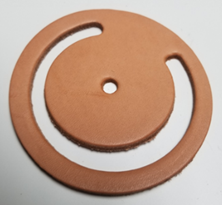 Remove one of the cap screws located at the base of the plunger body and loosen the other cap screw.
- Remove the pump body from the pump base.
- Remove the check valve from the valve leather.
- Remove the old valve leather. Clean any old leather off the column and base.
- Position the raised end of the check valve at the attached/hinged end of the valve leather.
- Reattach the check valve to the valve leather with the screw, nut, and washer.
- Position the new valve leather with the check valve on the base.
- Reattach the pump body to the base by reinstalling and tightening the cap screws.