If your water flow stops before your pump starts, you should start checking the pre-charge pressure in the bladder / diaphragm type water storage tank before assuming there is an issue with the pump.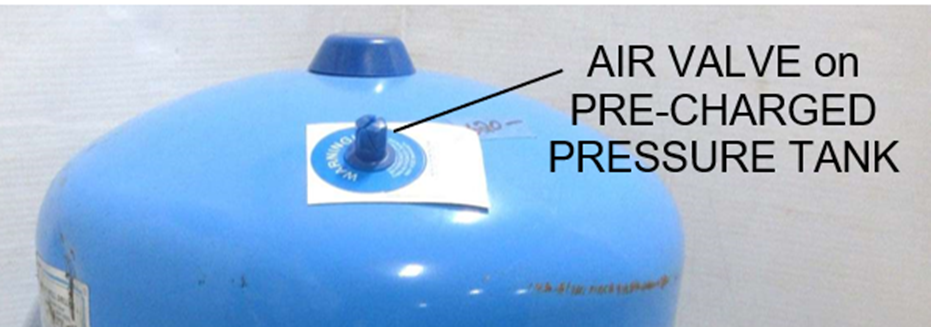
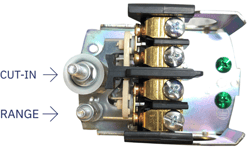
 Often when either the pressure tank or pressure switch component of the water system is replaced, the internal tank pressure or the pressure switch cut-in is different and adjustments must be made. This can occur immediately or in some cases the problem will not show up until the seasons change. Normally transitions between winter to spring or spring to summer which affect the ambient temperature in the area where the tank is installed will affect the internal pressure in the tank. Warming up will cause the air inside the tank to expand and increase the internal pressure. The conditions where the water flow stops before the pump starts is most often due to not having enough difference between the pressure switch “CUT-IN” (PUMP START) setting and the pre-charge pressure of the tank.
Most information you will find from pressure switch and pre-charged tank manufacturer manuals or online suggests the tank pre-charge is normally set at least 2 PSI below the pressure switch cut-in pressure. A 2 PSI difference may be sufficient if the ambient temperature does not fluctuate. However, if the ambient temperature is subject to change this may not be enough difference. Use your car tires for example, on a chilly morning if you check the tire pressure it might be 32 PSI but in the heat of the day the air will expand, and the pressure may go up to 35 PSI. This is the same in the tank and may cause the 2 PSI pressure differential to disappear causing the CUT-IN pressure to be equal to or higher than the internal pressure of the tank. As mentioned, these issues most often occur in the springtime, after a new pressure tank was installed in the frigid winter months. If this occurs you will be right out of water flow before the pump starts, therefore water flow would start at the same time the pump starts. With proper tank pressure to switch cut in settings the water flow will never stop flowing as the pump will start before the water in the tank has been fully depleted.
We suggest that you check the tanks pre-charge pressure and the pressure switch cut in setting every time one of these two components is replaced. The new pressure switch is factory set, and it is common for them to vary from the labelled settings by a couple PSI. We suggest that you determine what you want the cut-in and cut-out settings to be and adjust the switch first, monitoring the cut-in and cut-out points on your pressure gauge. Then, adjust the tank pre-charge accordingly to ensure the pre-charge is approximately 15% PSI below the pressure switch cut-in pressure to avoid this situation.
See the note below on how to adjust the internal pressure of a pre-charged pressure tank.
LOW PRESSURE CUT-OUT FEATURE
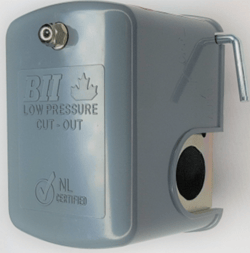 Pressure switches with a “Low Pressure Cut-Out” feature will cut out (stop the pump) if the pressure drops 10 PSI below the switches cut-in pressure to protect against the pump running dry if the water level in the well drops too low. This excellent feature can also result in nuisance tripping, like in the following scenario.
If a submersible pump starts to lose pumping capacity due to worn or partially clogged impellers / diffusers you could run into a situation where the pump cannot keep up to the demand. This will cause the PSI in the system to drop below the cut-out point causing a nuisance trip. Basically, if you are drawing water from the tank at a faster GPM rate than your pump can produce and supply back into the pressure tank, the system pressure will drop out, causing the pressure to drop 10 PSI below the cut-in triggering the low -pressure switch to cut-out sensing that the pump has run out of water in error. You must make sure that your pump can provide sufficient capacity to avoid this situation. Too often it is assumed this cut-out is caused by a defective switch when the switch is preforming as it should.
Adjusting Tank Pre-Charge Pressure

#1 - Remove the protective air valve cap and check the pre-charge pressure using a suitable pressure gauge. The tank should be at room temperature and must be completely drained to ensure it is empty of water.
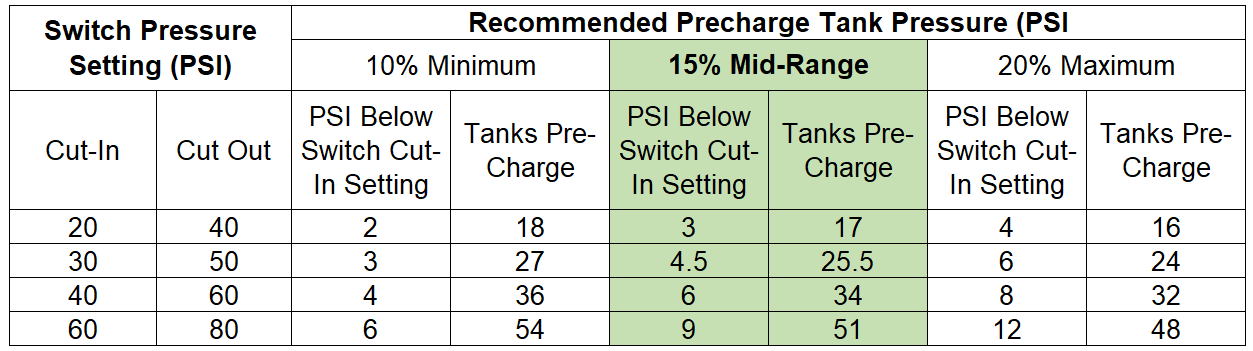
#2 - Pressure tank and pressure switch installation instructions will often advise to release or add air as necessary to make the pre-charge pressure equal to 2 PSI minimum below the pressure switch cut in setting. However, the 2 PSI is the minimum for a 20-40 switch, it is not enough for a 40-60 switch which should be 6 PSI below. Some information suggests that 10% - 20% below the pressure switch cut-in setting is a suitable range. We suggest that the mid-range of 15 % will be sufficient to minimize problems due to small inaccuracies between the system pressure gauge and the air pressure gauge you are using, as well as changes in ambient temperature as seasons change. The chart below provides the suggested tank pre-charge based on the common pressure switch cut-in settings.
 Note: Pressure switch settings may be out-of-adjustment. For example, if labeled 30/50, it may be 28 or 29 to 48 or 49. See how to adjust your pressure switch using the link below:
How do I adjust the CUT-IN and CUT-OUT settings of a Pressure Switch? (boshart.com)