 NOTES: Trenches should be properly shored-up to prevent cave-ins. Trenches along side the well casing should be made deep enough to prevent frost penetration. Allow enough room around the casing to fasten clamps.
Wear the correct safety gear for the installation conditions.
It is the sole responsibility of the installer to ensure safe installation of the product and to ensure all state, provincial, and local plumbing and building codes and regulations are met.
Required Tools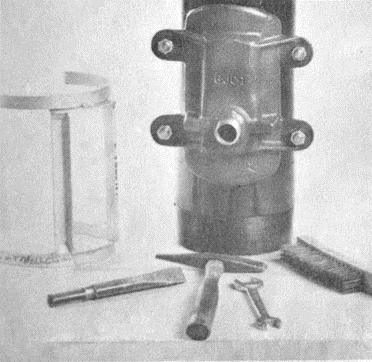
- Cutting torch or 4-1/2” hand grinder
- Heat resistant gloves
- Cutting guide
- Level
- Face shield
- Pencil or marker
- Tinners hammer or other tool to pry out cut portion of well casing
- Brush, chisel, or other de-burring tool
- Wrench
Installation Instructions
- Establish the location of the hole to be cut:
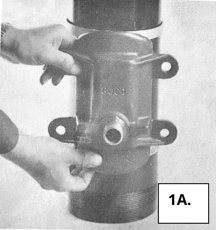
Snap the cutting guide onto the well casing at the location where you wish to install the adapter by pushing the cutting guide onto the well casing. Set the steel housing into the cutting guide and check for correct location of adapter.
1B. If no cutting guide is available, hold the housing on the O.D. of the well casing in the correct position and mark around the outside of the housing. Cut the casing on the inside of the rectangular mark. 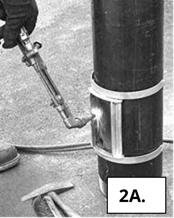 Cut hole in well casing: After the correct location has been established, remove the adapter and proceed with cutting the opening in the well casing using one of the following methods,
2A. With a cutting torch, cut a hole near the inside, bottom corner of the cutting guide opening. Move the cutting torch to the cutting guide, resting the side of the tip on the cutting guide. Move the cutting torch slowly along all four sides of the guide. After the opening has been cut, and the cutting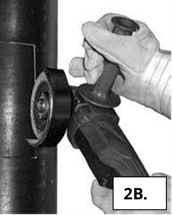 guide has been removed, pry out the cut portion of the casing at the bottom edge.
2B. Use a 4-1/2” hand grinder with a cutting wheel to cut an opening in the well casing. Avoid cutting the rectangle oversized.
Note: With either method, the steel lips on the top and bottom of the housing must fit into the cut hole. Do not cut the hole too wide, as the gaps will be hard to fill. The brass insert face must fit through the cut hole.
- Remove the cut portion of the well casing.
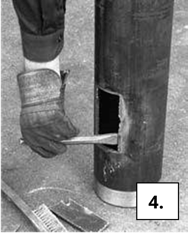 Remove all slag and burrs from the cut opening. The casing must be clean and smooth to create a pressure seal.
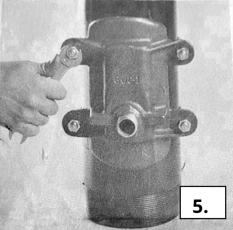 Set the pitless into the opening to check fit. If it does not fit the opening, note where the interference is and install the cutting guide again. Re-cut the opening to fit, cleaning off all slag and burrs when finished.
- Set the pitless housing into the opening. Make sure the water flow opening is on the bottom end of the housing. The housing must fit snugly against the well casing. Slip on the two U-clamps and tighten the nuts evenly and firmly with a wrench.
Additional Resources: