Let us start by clearing up what is meant by tether point and tether length. Boshart 860 & 870 Series Float switches and 880 Series Control Float Switches are sometimes referred to as “Tethered Float Switches”.
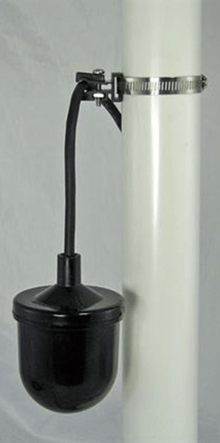 A “tethered” float switch is one of the most common switch types used for sump pumps. It has a floating element sealed to the electrical cord. The cord is tethered to the pump or often to the pump discharge piping, this is the tether point. The length of cord between the tether point and the float is the tether length. The float swings in an arc as the water level rises and the basin fills and falls as the water is pumped from the basin. A tethered float consists of a hollow plastic enclosure with a switch mechanism inside. When lifted, the float tilts upwards and the change in position actuates the switch. Pump down models 860D and 870D start the pump when water fills the basin. The tether point and tether length of the cord determines the “Pump Start Level” as the float swings upwards. As the float ball reaches the top, it activates the internal float switch mechanism which turns on the pump. The pump then empties the basin and when the float swings downward and reaches the bottom trigger point it deactivates the float switch, turning the pump off.
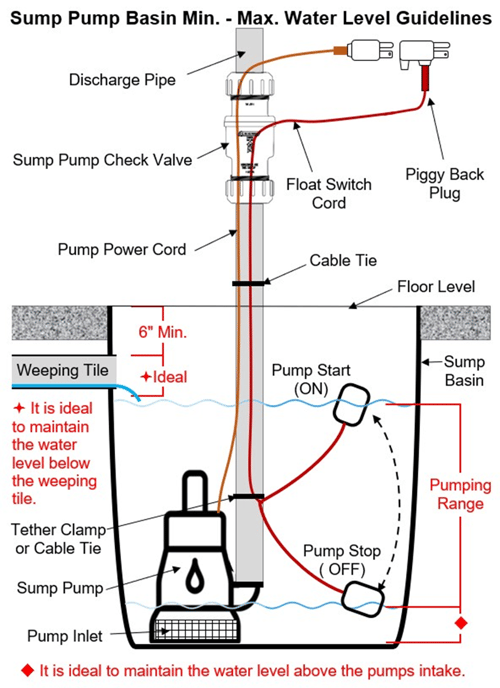
Correctly positioning your sump pump float switch relative to the water line is extremely important to ensure proper pump operation. By raising or lowering your float tether point to the correct level you will keep your pump turning on and off at the desired levels and decrease the risk of basement flooding.
Water level set points:
We suggest that the pump start level is set at a minimum of 6 inches below the floor surface, and ideally under the weeping tile. This provides a margin of safety in the event of heavy rain causing higher than normal volumes of water to enter the basin. In addition, it helps prevent having a damp floor due to water wicking upwards through the cement slab. The water in your sump pit typically needs to be approximately 3 inches but it may be more depending on the model of pump. You need to ensure the pumps intake remains below the water level so that the pump works properly. If you don’t have sufficient water in your basin all the time it is best to add some water on a regular basis to test the pumps operation and maintain the minimum water level. It is important that the pumps inlet is fully submerged before the float triggers the pump to start. This prevents the pump from sucking in air which could result in an air lock / cavitation which will prevent the pump from pumping water. Drilling a weep hole in the discharge line can safeguard against pump cavitation if the basin runs dry.
See article on drilling a “weep” hole in your discharge pipe.
1. Disconnect Pump from Power Source
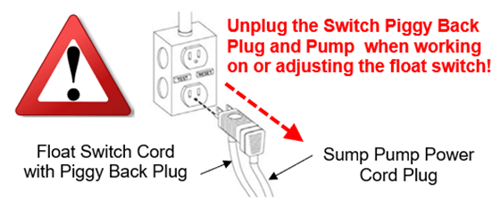 Always disconnect the pump from the power source when working on the pump or float switch. Mixing electricity and water creates a risk of electrocution. Do not take chances, it is always better to be safe than sorry.
2. Adjust the Tether Point Float Up or Down
 Manually adjust the float switch tether point up or down based on the desired range of water level in the basin at the pump start and pump stop trigger points. Higher water levels need a higher tether point.
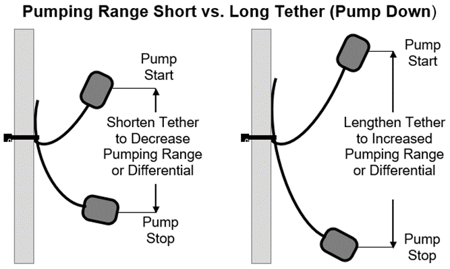
3. Adjust the Tether Length
 If you find that you are not getting the desired pumping range, manually adjust the float switch tether length. Increasing the tether length increases the pumping range between pump start and pump stop trigger points. Decreasing the tether length reduces the pumping range between pump start and pump stop trigger points. You will be able to simulate the float action by manually lifting and lowering the float by hand. You will hear the internal mechanism trip the switch upon both lifting and lowering of the float.
4. Test with Bucket of Water
After setting your float switch tether point and tether length at the correct level, reattach the power and test the system with a few buckets of water to simulate rain. The pump should turn on as the water level rises to just below the weeping tile or a minimum of 6" below the floor level and run until nearly empty, leaving enough water in the basin to cover the sump pumps inlet screen. Actual water level change may result in the switch tripping at slightly different levels than when you simulated the float action manually, lifting and lowering the float by hand. If the float switch is still not set at the desired on / off levels, readjustment of the tether point and / or length will be required.
5. Readjust Float Switch
Disconnect the pump from the power and readjust. It is common that most systems require readjustment at least one time. It may take 2-3 attempts to get the float set at the perfect on-off level for your sump basin.