How do I repair my leaking or malfunctioning wall hydrant?
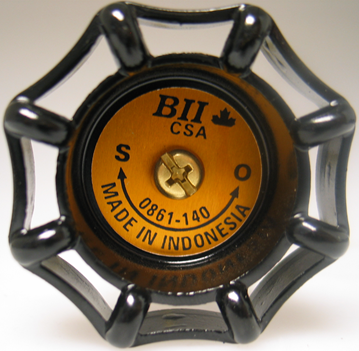
To repair a leaking or malfunctioning wall hydrant, the first and most important thing that needs to be done is to confirm the make and model number to ensure the right replacement parts are ordered! Make and model number should be on the identification disc on the hand wheel.

If your wall hydrant is...
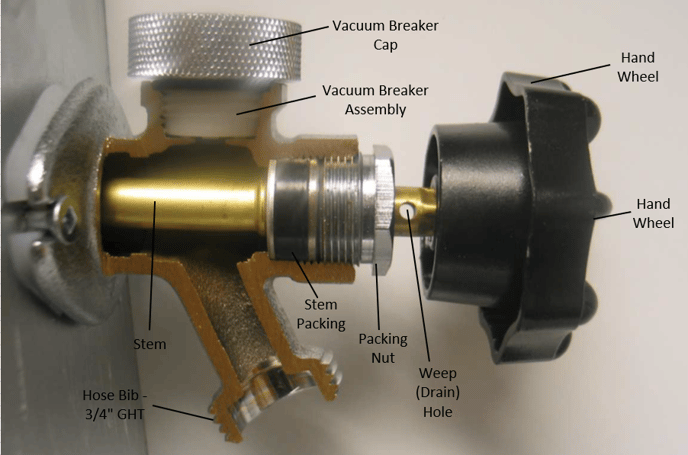
Leaking out of the garden hose connection thread when “OFF”:- Cause: worn out washer or broken faucet seat.
- The recommended repair is to replace the freeze-proof plunger (a.k.a. check valve) assembly. Alternatively, it may be easier to simply replace the entire stem assembly, especially if you notice wear on any of the other components.
Leaking out of the packing nut (bonnet):
- Cause: loose packing nut or worn out stem packing seal.
- The stem packing must be replaced. If there is wear on other components replacing the entire stem assembly is suggested.
Leaking out of the vacuum breaker cap (air-vent):
- Cause: worn, broken or missing vacuum breaker parts.
- Repair by removing old parts & replacing them with a new assembly kit.
Leaking out of the weep hole during use:
- Cause: worn out O-ring on the check assembly. This happens over time or if the faucet is left “ON” for long periods of time.
- Replace with a new plunger (a.k.a. new check assembly) or replace the full stem assembly if there is wear on any of the other components.

Basic Steps - Packing, Plunger or Stem Assembly
#1 - Shut-off water supply to the wall hydrant, then open the wall hydrant all the way.
#2 -Remove handle.
#3 - Loosen the packing nut (a.k.a. bonnet) with a wrench and remove the stem assembly.
#4 - With the stem removed, briefly turn water supply back on to flush debris from the hydrant, then shut it off again.
#5 - Inspect the stem for cracks or damage to the O-rings or other parts.
#6 - Identify all the parts which require replacement.
#7 - Reinstall stem with bonnet in the open position, close the hydrant, and turn water back on to the wall hydrant.
#8 - Inspect for leaks.
Basic Steps - Vacuum Breaker Assembly
#1 - Shut-off water supply to the wall hydrant, then open the wall hydrant all the way to release pressure and drain the faucet.
#2 - Remove the vacuum cap.
#3 - Remove the worn vacuum breaker assembly.
#4 - Reinstall a new vacuum breaker kit.

#5 - Close the hydrant and turn water back on to the valve.
#6 - Inspect for leaks.
