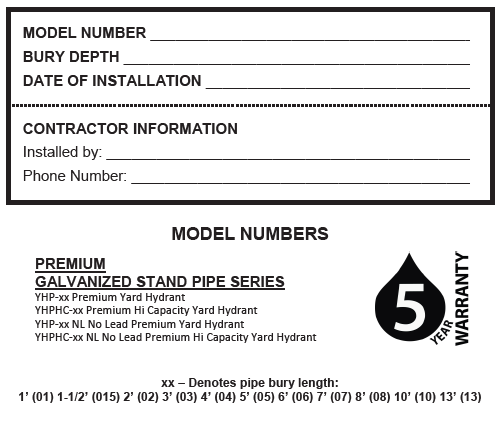
Thank you for purchasing a Boshart Industries (BII) Premium Yard Hydrant.
We are confident that with the proper installation it will give you years of trouble free use with little maintenance. We recommend you record the model number, bury depth and the installation date in the space provided below and keep these instructions for future reference.
Installation Instructions
- First be sure the water line on which the hydrant is to be installed has been thoroughly flushed to wash out any sand or foreign particles. BII will not warrant or accept any responsibility if the water line is not flushed out prior to attachment of the hydrant.
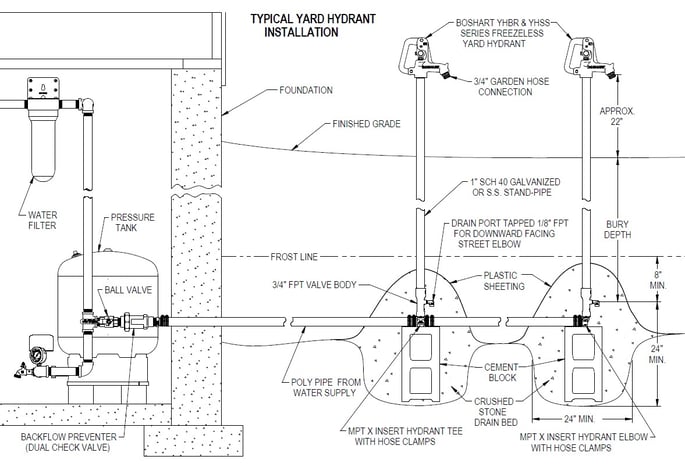
- Prepare a hole that is approximately 2 feet in diameter and below the frost line. It is a good idea to put a brick or large stone under the hydrant; this will prevent the hydrant from settling.
- Be sure that the hydrant valve body is installed below the frost line. Be sure to put a sufficient quantity of gravel, crushed rock or some coarse material around and above the drain of the hydrant. This will permit proper drainage.
- Connect hydrant to water line using appropriate fittings. Elbows and tees are available. When tightening the fitting, be sure to hold the valve body with a pipe wrench to ensure it does not screw further into the hydrant stand pipe; this would change the factory adjustment of the plunger.
IMPORTANT: DO NOT BACKFILL HOLE UNTIL ALL TESTS HAVE BEEN SUCCESSFULLY PERFORMED.
Turn on the hydrant by raising the handle to let the water flow, slowly close the hydrant, the water should drain out of the 1/8” drain port. If the hydrant is not working properly, refer to the adjustment section below. Place about 2 feet of crushed stone or gravel in the bottom of the hole and fill with dirt. BII will not accept any responsibility for digging up the hydrant if the installer fails to flush the line and check for proper operation before backfilling.
 Best Practice: Installing a 1/8” 90° Street Elbow in the 1/8” FPT drain port connection with the open-end facing down is an optional safeguard against any foreign debris getting into and potentially clogging the drain port when back filling or from sand or silt that may enter the crushed stone drainage bed over many years of service.
Adjustment
If the hydrant will not shut off completely, the plunger (N) in the bottom of the hydrant can be lowered by raising the point of contact of the square head set screw (H) on the operating rod (D).
Cautions
#1 The brass packing nut (F) located on the head (A) of the BII hydrant has been factory adjusted. If leakage should occur it may be necessary to slightly tighten the brass packing nut (F). Do not over tighten the brass packing nut (F); damage may occur to the inner O-rings (E).
#2 Do not leave a hose attached to the hose bibb in freezing temperatures as it may prevent proper drainage of the shut-off valve.
#3 If required, only place a wrench on the valve body (O). Do not place it on the galvanized steel pipe, as it will damage the protective coating.
#4 If the hose is attached to the hose bibb of the hydrant when the hydrant is shut off, back siphoning can occur if the end of the hose is left in a container of liquid. The end of the hose must be left open to the air so the hydrant can drain back.
#5 In the event that the hydrant head (A) must be removed to replace a plunger (N), DO NOT place a pipe wrench on the galvanized steel pipe (Q), it will cause damage to the factory coating. To prevent the stainless steel standpipe (Q) from turning, use a strap wrench; this should also be followed if tightening the valve body (O).
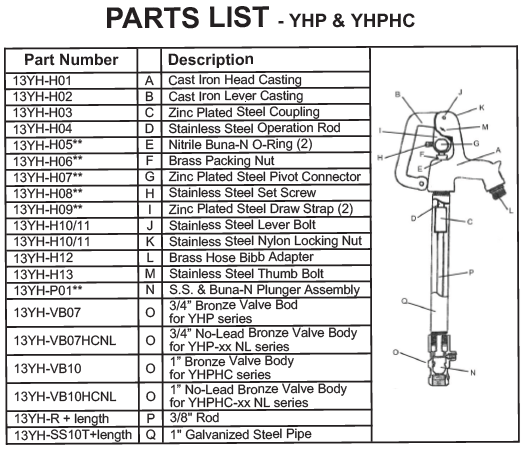
NOTE: 13YH-H10 & 13YH-H11 sold as a kit Part no. 13Yh-H10/11
NOTE: In the event that the plunger (N) needs changing, loosen the set screw (H), place a wrench on the hydrant head (A) and unscrew. Place vise-grips on the connecting rod (P) and pull the rod and plunger out of the valve body. Replace with a new plunger and re-assemble the unit. Re-set the operating rod and tighten the set screw.