Yard Hydrant Troubleshooting & Maintenance

CALL BEFORE YOU DIG! MOST YARD HYDRANT ISSUES CAN BE SOLVED BY ADJUSTMENT OR PARTS REPLACEMENT FROM THE SURFACE WITHOUT DIGGING UP THE HYDRANT!
For a detailed overview of Boshart Yard Hydrant Warranty please click here.
 1. Water continues to drip from the spout after the hydrant is shut off.
1a) If the hydrant leaks just after installation, the valve seat may be fouled with debris, such as small grit particles or scale from the supply line. It is recommended to thoroughly flush the supply line before installing the yard hydrant. If this occurs, you will need to pull the connecting rod and plunger assembly and flush out the valve body and standpipe.
See “How to Adjust or Repair Boshart Yard Hydrant” on our Knowledge Base Site.
https://support.boshart.com/how-to-adjust-or-repair-boshart-yard-hydrant
1b) If the yard hydrant starts to leak after years of service, you will need to pull the plunger out and inspect it to see if it is worn or damaged.
IMPORTANT: It is recommended to have a replacement plunger on hand and to install a new plunger while the unit is disassembled.
See “How to Adjust or Repair Boshart Yard Hydrant” on our Knowledge Base Site.
https://support.boshart.com/how-to-adjust-or-repair-boshart-yard-hydrant
1c) Check the closing action of the handle. The handle is designed to go over center on the cam which ensures the water pressure will force the handle towards the closed position. If you notice that the handle tends to open due to system pressure, it would indicate a problem with the pivot position. This is extremely rare (consult the factory).
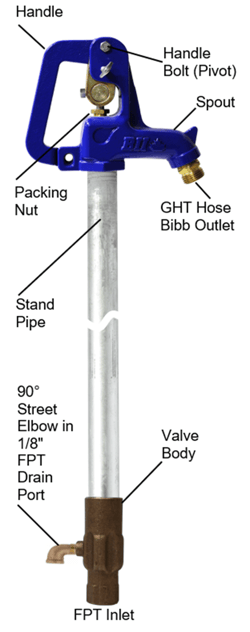
2. Water leaks out between the stainless operating rod and the brass packing bushing when the hydrant is on.
2a) This condition is more prevalent when a hose is attached, and the yard hydrant is left open with the packing subjected to full system pressure. The brass packing nut may need to be tightened occasionally to stop a leak at the packing (two #204 O-rings). To correct, simply tighten the packing nut in small 5 -10° increments until the leak stops.
2b) If the leak persists and the packing nut is getting tight it indicates the O-rings are worn and need replacement.
See “How to Adjust or Repair Boshart Yard Hydrant” on our Knowledge Base Site.
https://support.boshart.com/how-to-adjust-or-repair-boshart-yard-hydrant
3. Water leaks from below ground around the standpipe when the hydrant is on.
3a) This is a rare situation which can be caused by a slow leak of water out the drain hole. It is easily corrected without digging up the hydrant if the leak is caused by either a worn plunger or by a small piece of foreign debris from the supply line getting lodged between the plunger rubber and the valve body. In either case you will need to remove the yard hydrant head and pull the rod and plunger out of the standpipe for inspection. If the plunger is found to be in “new” condition without any wear or damage such as scratches, flushing the hydrant and reinstalling the rod and plunger may correct the leak. However, if a worn or damaged plunger causes the leak the plunger must be replaced.
 If the hydrant should ever need a new plunger there is NO NEED TO DIG UP THE HYDRANT.
Turn off the water pressure, loosen the adjustment set screw, then mark the potion of the head casting by wrapping electrical or pipe wrap around the standpipe just below the hydrant head. The tape will mark the position for reassembly as well as provide protection to the pipe finish when unthreading the head casting from the standpipe. Next pull up the operating rod to pull out the plunger. Replace the plunger, apply P.T.F.E tape and a thread sealing compound, then thread the head casting back to the same mark on pipe.
See “How to Adjust or Repair Boshart Yard Hydrant” on our Knowledge Base Site.
https://support.boshart.com/how-to-adjust-or-repair-boshart-yard-hydrant
3b) More commonly, this indicates a severe problem in which a larger volume of water is seeping up out of the ground. It is an indication of a large leak which is typically caused by standpipe failure which itself is caused by accelerated electrolysis corrosion. Some soil conditions are overly aggressive and can cause premature failure of the galvanized standpipe near the valve body where the pipe is always in a wet environment in the drain bed. If this is the case, you will need to dig up and replace the yard hydrant. We highly recommend that you select a highly corrosion resistant yard hydrant, which is manufactured using a 304 stainless steel standpipe, connecting rod, and hex coupling. Contact your sales representative for more details.
3c) It is also possible that the valve body which is to be buried below the frost level to ensure it does not freeze, has frozen due to below normal temperatures. The valve body cannot withstand freezing temperatures. It may crack or burst if frozen causing an underground water leak.
3d) It is also noteworthy to mention that in a high percentage of these cases it is found to be a cracked or broken fitting or water line close to the inlet connection. It is important to use high quality hydrant tees and elbows along with all 300 series stainless steel gear clamps and to use proper installation methods. This will reduce the stress on the fittings and supply lines to reduce the risk of failure.
NOTICE: If the ground freezes at or below the valve body (bottom of the hydrant), the warranty is void and damage due to improper installation or an act of nature is not covered by the manufacturer's warranty.
See “How do I install my Yard Hydrant” on our Knowledge Base Site.
https://support.boshart.com/how-do-i-install-my-yard-hydrant
4. Hydrant will not drain back when shut off.
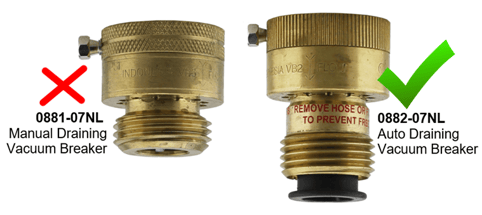
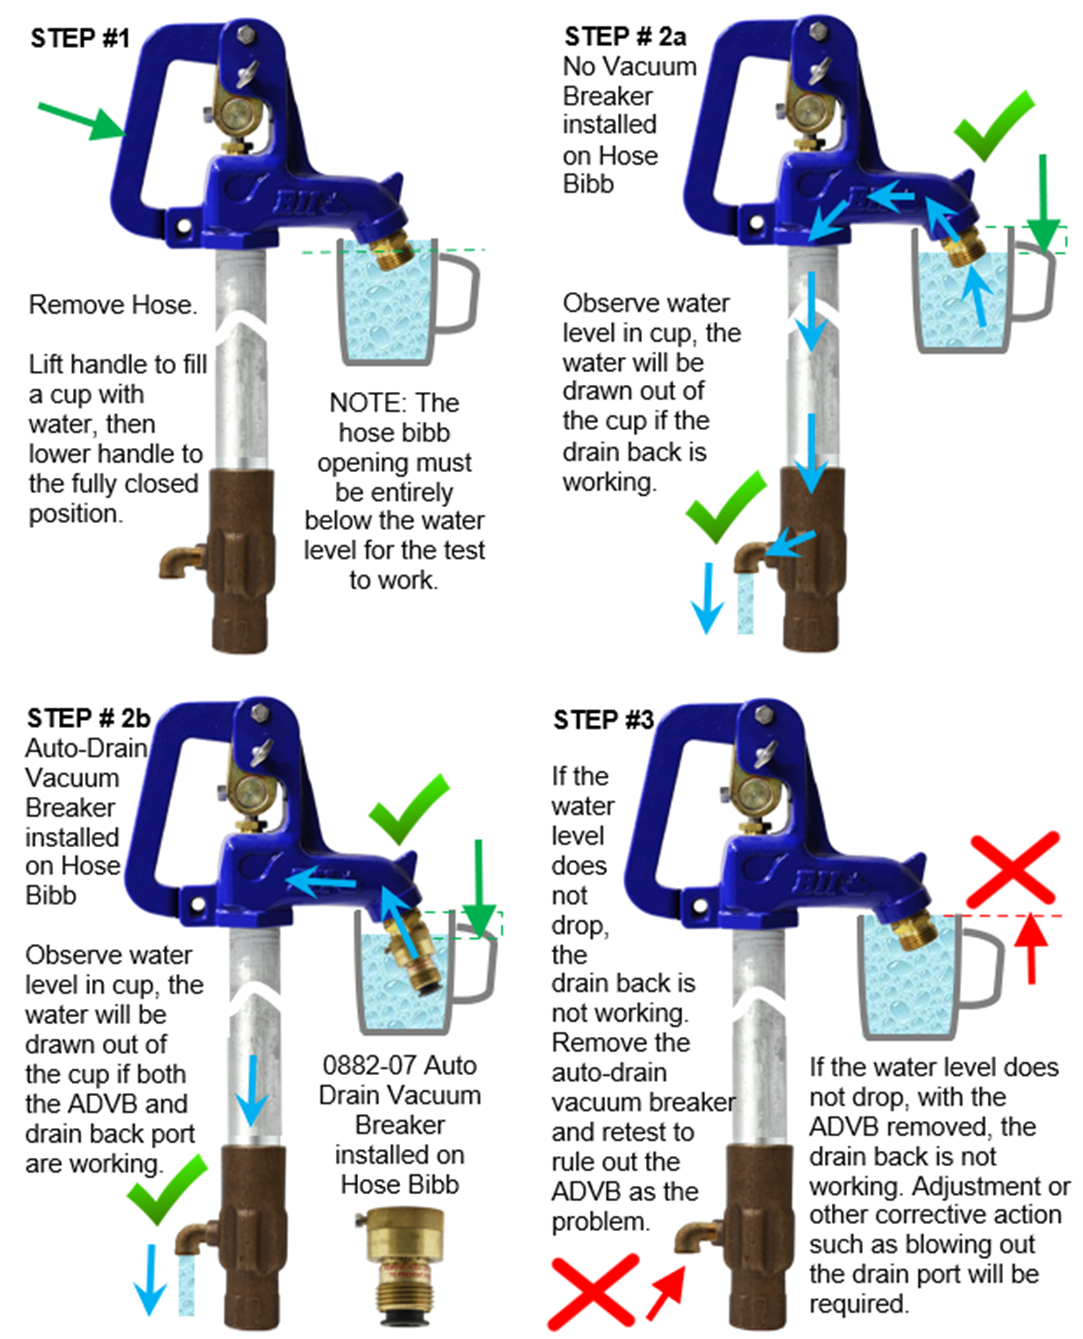
4a) Make sure there are no attachments such as a hose or irrigation timer device affixed on the spout hose bibb. These attachments will not allow air to enter the spout and hold the hydrant pipe full of water. If the hydrant has a vacuum breaker attached to safeguard against back siphonage, make sure it is an auto-draining type. This will allow the hydrant standpipe to completely empty to prevent freezing.
WARNING: If the hydrant has a manual type of vacuum breaker we would advise upgrading to an automatic. The manual type requires that the lever be held to the side to allow air into the hydrant to allow the drain back. The problem is that it is hard to know when the drain back is complete and most often the user does not hold it long enough to fully drain the hydrant. This can result in freeze up in the standpipe.
To test that the hydrant is draining back properly remove the vacuum breaker and lower the handle to close the hydrant fully. Then place a cup of water so that the hose bibb is submersed. If the hydrant is working properly the water will be drawn up and out of the cup. (See diagrams below)
If the water is not drawn from the cup the drain back is not working. This is an indication of one of the following conditions:
- The plunger is not adjusted properly and is covering the drain port.
- Solution: Make sure the handle is in the fully closed position. If so, you may need to adjust the plunger setting. Re-check to ensure the water siphons out of the cup after adjustment.
See “How to Adjust or Repair a Boshart Yard Hydrant” on our Knowledge Base Site.
https://support.boshart.com/how-to-adjust-or-repair-boshart-yard-hydrant
- The drain port has become clogged with debris or clay that has infiltrated from the drain bed preventing water from being discharged out of the drain port.
- Solution: Make sure the plunger adjustment is correct. Then with the hydrant closed connect a water hose or airline to the hose bibb and force water or air down the standpipe. This will in most cases dislodge the dirt or debris and open the drain port. Re-check to ensure the water siphons out of the cup after adjustment or blowing the dirt out of the drain port opening.
-
The installation of a downward facing 90° street elbow will reduce the chance of this occurring and can add years of trouble-free service life to the yard hydrant installation.
- Solution: Make sure the handle is in the fully closed position. If so, you may need to adjust the plunger setting. Re-check to ensure the water siphons out of the cup after adjustment.
5. I am getting little or no flow when I open the hydrant handle.
5a) Although rare there has been a handful of reports where the long connection rod has corroded off at the thread by the plunger connection. This is caused by aggressive water which corrodes the steel rod.
5b) In some cases the loss of flow is caused by the delamination of the rubber from the internal metal core of the plunger. This is mostly, but not always, caused by prolonged periods of time when the hydrant is not used, and the rubber seizes to the brass or bronze valve body.
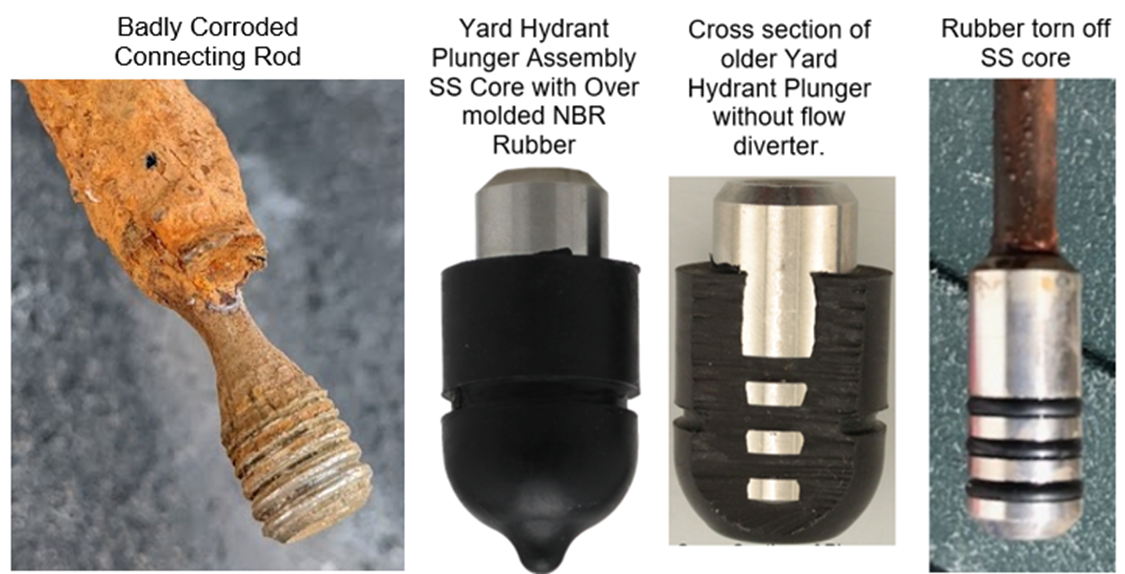
5c) There also have been reports where the hydrant has frozen in unusually cold periods, and someone tries to get the hydrant to open. When it is frozen, the cam in the linkage system can assert high force on the plunger, tearing the internal metal core from the rubber. This leaves the plunger sealing off the valve body port.
6. I am getting a short burst of rusty water each time I open the hydrant.
6a) A low volume of rusty water that quickly clears up each time you open the hydrant indicates that there is either corrosion on the standpipe or a buildup of iron deposits on the valve body and internal wetted surface areas. The first burst of water pressure can sometimes send some rusty looking water out of the spout.
We highly recommend that when this hydrant is eventually replaced that you select the highly corrosion resistant yard hydrant which is manufactured using a 304 stainless steel standpipe, connecting rod, and hex coupling. Contact your sales representative for more details.
6b) If you are getting a continuous flow of rusty water, it indicates that the supply line is full of rust and iron build up. In some cases, a well will produce water with high iron content and when the hydrant is installed in the service line between the well and the pressure system the water is not treated. This is something to take into consideration where there is an iron filter installed in the hose and the water is free of iron but the water from the hydrant is not.
NOTE: Rusty water may be an early indication of accelerated corrosion due to aggressive water conditions, or a case of an unusual amount of iron build up inside the supply line and yard hydrant. You may wish to investigate having a qualified water system professional shock the well and supply line to remove the iron buildup. If you are seeing a discoloration, just to be safe, you should have a bacteriological test run on the water.