How to Build a Submersible Pump Saver.
How to Build a Submersible Pump Saver.
Pump savers are easy to fabricate and assemble using standard plumbing and water well products.
They are ideal whether the application is for a water well, for pumping from a lake, ponds, canal, or river. See the article at the link below for more information:
https://support.boshart.com/what-is-a-pump-saver-and-how-does-it-work
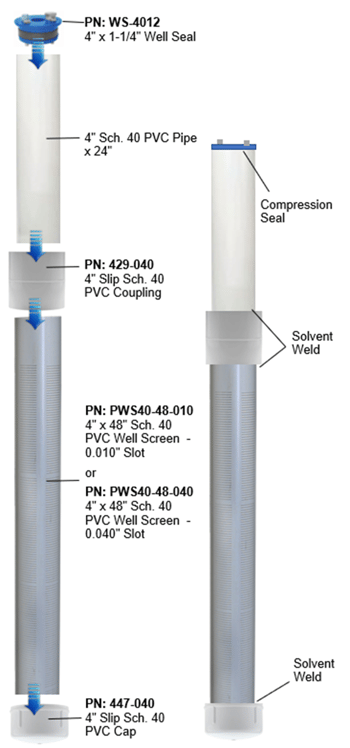
 The pump saver is assembled using a 4” diameter x 4 ft. slotted PVC well screen (Part Number: PWS-48-xxx), which is capped on the bottom using a 4” Schedule 40 PVC slip cap (Part Number: 447-040). The cap can be solvent welded or fastened using stainless steel screws depending on the installer's preference.
A 4” well seal secures the pumps discharge pipe in position and makes a seal between the well screen and the drop pipe. The seal is sized to match the size of the discharge piping connected to the submersible pump (Part Number WSP4010 (1” Pipe with 1.315” OD) or WPS4012WS-4012 (1-1/4” Pipe with 1.66” OD)).
The well seal is installed in the top end of the non-slotted section of 4” Sch. 40 PVC pipe which is typically 24” in length but should be as long as the “wet” end of the pump. This short piece of PVC pipe is joined to the slotted well screen using a 4” Schedule 40 PVC Slip Coupling (Part Number: 429-040).
IMPORTANT NOTES:
#1 - It is important to have the non-slotted section of pipe as long as the pump end and intake screen to keep the motor cool. Ensuring that water is drawing only from below the pumps intake screen, forces all the water to pass over the submersible motor improving the cooling properties.
#2 - Always refer to the submersible pump manufacturer's guidelines as to whether the pump can be operated in the horizontal position. Some pumps have bearings that require the pump to be installed vertically or at an angle to prevent premature bearing failure. This often requires the construction of a frame to which the pump can be secured. See the installation instructions at https://support.boshart.com/what-is-a-pump-saver-and-how-does-it-work
