Before getting started, it is extremely important to make sure you have an appropriate length of wall hydrant for your wall thickness. The inlet connection MUST extend through the wall and any insulation so that the connection is inside the warm space at a position that is easily accessible to make the water line connection.
Step # 1- Drill a 1-1/8" diameter hole on a 5° upward angle from the outside to ensure you have sufficient downward slope to the outlet for drainage. Drill through the foundation wall or the floor joist band. Then insert the faucet tube from the outside. WARNING: Do not drill the hole horizontally. A 1-1/8" diameter hole will only allow the tube to be installed at approximately up to 1.5°. It does not have enough play to properly slope the wall hydrant.
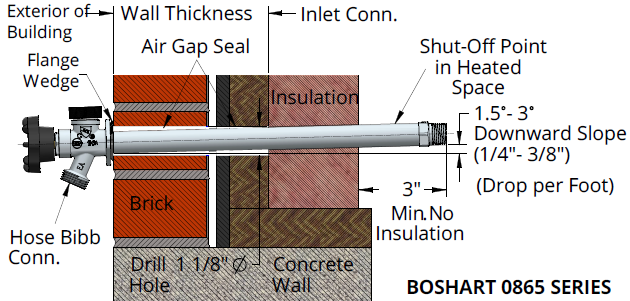
Step #2 - Position the faucet so that the faucet's spout is pointing directly downward. To check the spout's position from the inside of the building, place the “TOP” marking on the hex by the inlet connection pointing up.
Step #3- Place the angled, wedge-shaped, plastic flange with the thick side upwards to ensure the hydrant tube has a minimum of a 5° angle downwards to the spout to insure proper drainage. Then, secure the wall faucet flange on to the wall with two #8 or #10 wood or masonry screws depending on your construction. Failure to ensure the 5° angle will result in trapped water which will cause the wall faucet to freeze and fail, damaging internal components or in the worst-case scenario, burst the tube and potentially cause water damage.
Step #4 - If you are using the internal solder (sweat) connection, the stem assembly MUST be removed to prevent damage to the rubber seals due to excessive heat. To remove the stem assembly, unscrew the hexagon nut behind the hand wheel and then pull the valve stem straight out of the tube by pulling on the handwheel.
Step #5 - Fill the free space (air gap) around the tube with caulking to seal the air gap.
Step #6 – When insulating, DO NOT insulate beyond 3” from the inlet connection. The 3” section of the tube from the inlet end must not be insulated from the warmth of the building to ensure it does not freeze. Insulating too close to or over the inlet connection may cause the wall faucet to freeze and fail, damaging internal components, or in worst-case scenario, burst the tube and potentially cause water damage.
IMPORTANT WARNINGS:
#1 - Winterization: When the cold weather arrives, it is crucial to remove the hose to ensure proper drainage. Failure to remove the hose WILL cause the wall faucet to freeze and fail, damaging internal components. It is not a product defect! Turn the handle to the closed position (clockwise) and always detach the hose from the spout if there is any chance of frost. Damage due to freezing will void warranty.
#2 – Keep Inlet Heated: Wall hydrants are frost-proof because the water is shut off inside the heated portion of the building. If the building is left unheated for an extended period, the water supply lines must be drained and all plumbing fixtures and components properly winterized to prevent freezing.